Home
Integrations Library
Media Buying Integrations
Whop Ads Integration

SERIES:

Whop Ads Integration

Learn how to set up the Whop Ads Conversions API integration in Everflow, including how click context reaches Whop and how to verify that events are delivered.

Beta

The Whop Ads integration is currently in beta. It is live and you can set it up today, but it is still being rolled out, so speak to your account manager before you build a campaign around it.

Overview

Some advertisers cannot run their own ad platform pixels. In restricted verticals such as telehealth, supplements and financial offers, ad accounts get flagged and shut off, and partners are reluctant to put a brand's pixel on their own domains. Whop Ads solves that by taking the conversion once and passing it on for you.

Whop Ads is the advertising product. Inside Everflow the integration, the delivery method and the postback fields are all labelled simply Whop, which is what you will see on screen.

With the Whop Conversions API, Everflow sends one server-to-server event to Whop, which routes the conversion and its full click context on to the ad platform it came from. You do not maintain a separate integration per ad network.

1

Everflow records the conversion

Your partner sends a visitor, the visitor converts, and Everflow attributes it as normal.

2

One event goes to Whop

Everflow sends a single server-to-server event carrying the conversion and the click context behind it.

3

Whop routes it onward

Whop works out which ad platform the original click came from and re-emits the event there.

Whop routes the event, it does not own the click

Whop is not the platform that served the ad, so it does not already know about the click. It works out where the event belongs from the attribution context Everflow sends, which is why that context matters as much as the conversion itself.

Before you start

If you do not have API access on your Whop account, ask your Whop contact for it.

How the click context reaches Whop

Whop can only route an event that carries attribution context: the click ID and the campaign parameters saying where the visitor came from. You do not add any of that yourself. When Whop sends a visitor to your landing page it adds utm_whop=true to the URL itself, and Everflow's SDK captures the context only when it sees that marker, so nothing changes for your other campaigns.

One thing does have to be set, and it is on the Whop side rather than in Everflow: your landing page goes into the Whop campaign as its Destination URL. That is what Whop appends the tracking parameters to, so without it there is no click for Whop to attach context to. Whop shows you the full list it will add:

The Destination URL field in a Whop campaign, with the list of parameters Whop appends to it, including utm_whop set to true

It is worth knowing about because it is visible in the event payload, and because it explains what you are looking at if an event ever arrives with no context attached.

❌ No context to route on

A visit that did not come through Whop carries no marker:

yourbrand.com/offer?oid=1&affid=89

Everflow records the conversion as normal, but there is no click context attached for Whop to resolve a destination from.

✅ Context captured

A visitor sent by Whop arrives with the marker already on the URL:

yourbrand.com/offer?oid=1&affid=89&utm_whop=true

The SDK captures the click context, so Whop can see which platform sent the visitor and route the event there.

An event with no context cannot be routed

If a conversion arrives with no click ID and no campaign parameters, Whop has nothing to work out a destination from and the event goes no further. The conversion still appears in your Everflow reporting exactly as it should, because the Everflow half genuinely succeeded, so this is worth knowing about when you are checking whether delivery is working.

Where to find your Account ID and API key

Both come from Whop, not from Everflow.

1

Open your Whop dashboard

If you have more than one business, switch to the one this traffic belongs to first. That business is the account the events are sent against.

2

Create a company API key

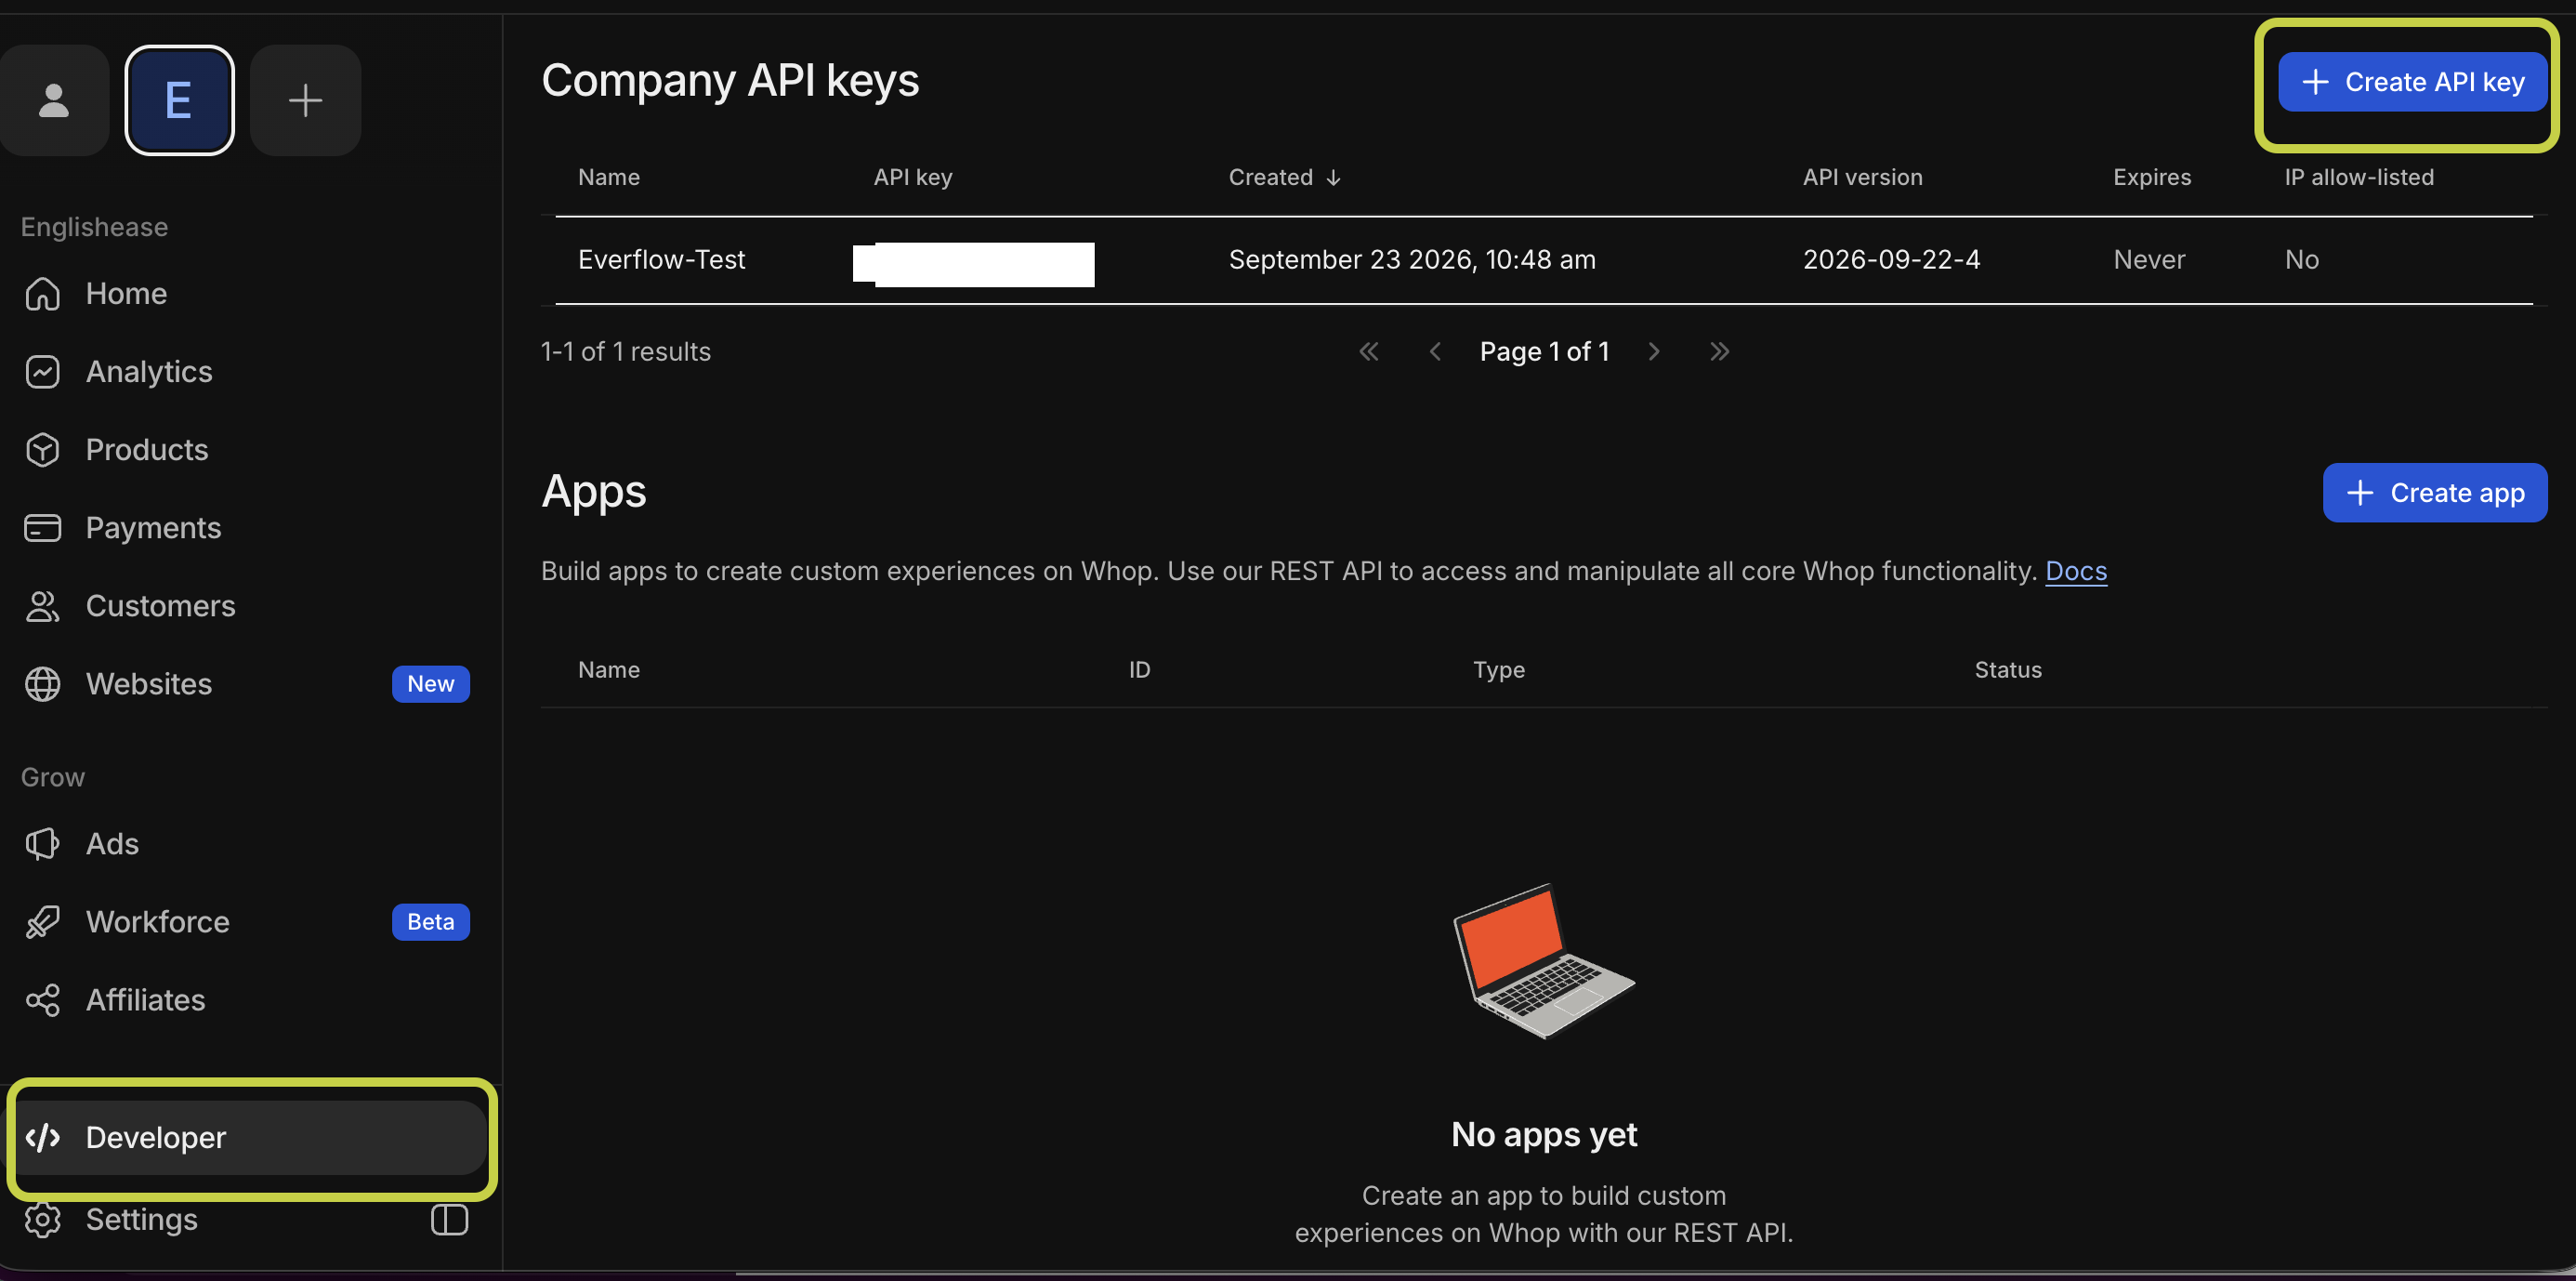
Open Developer at the bottom of the left-hand nav, then under Company API keys select Create API key and give it a name you will recognise later, such as Everflow.

3

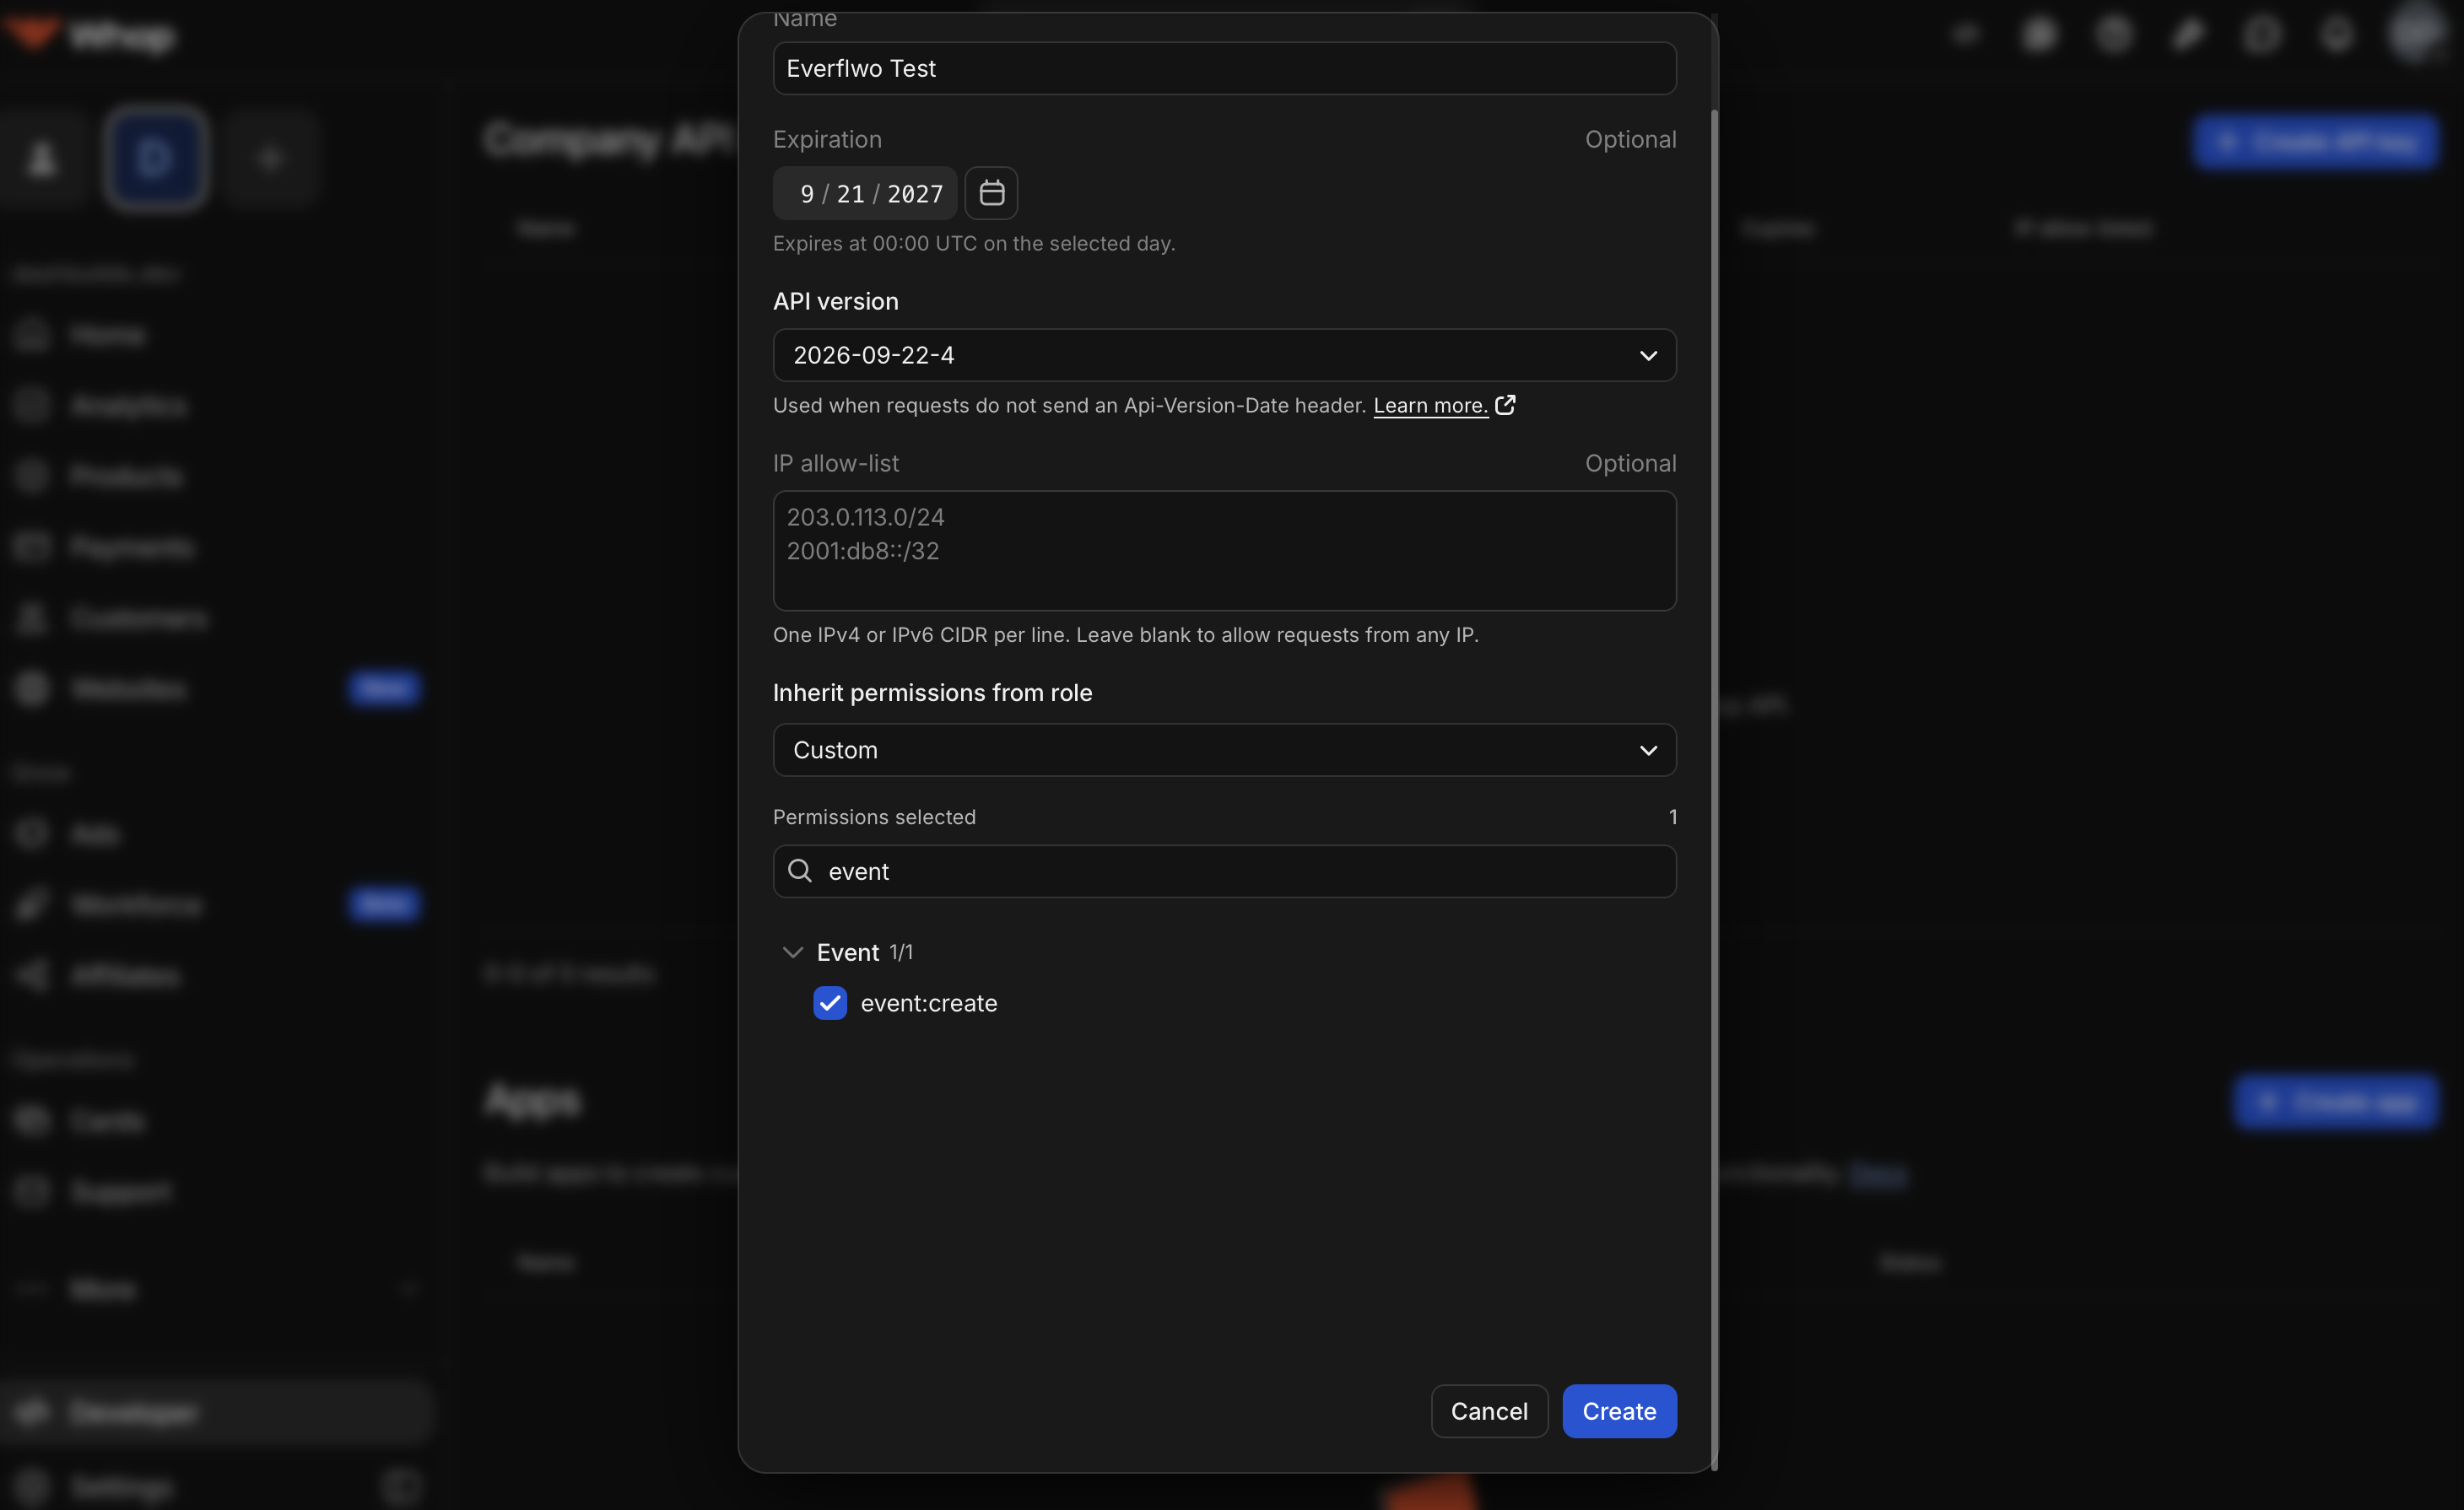
Give it the event:create permission

This is the one Everflow needs in order to send events. A key without it will be refused.

4

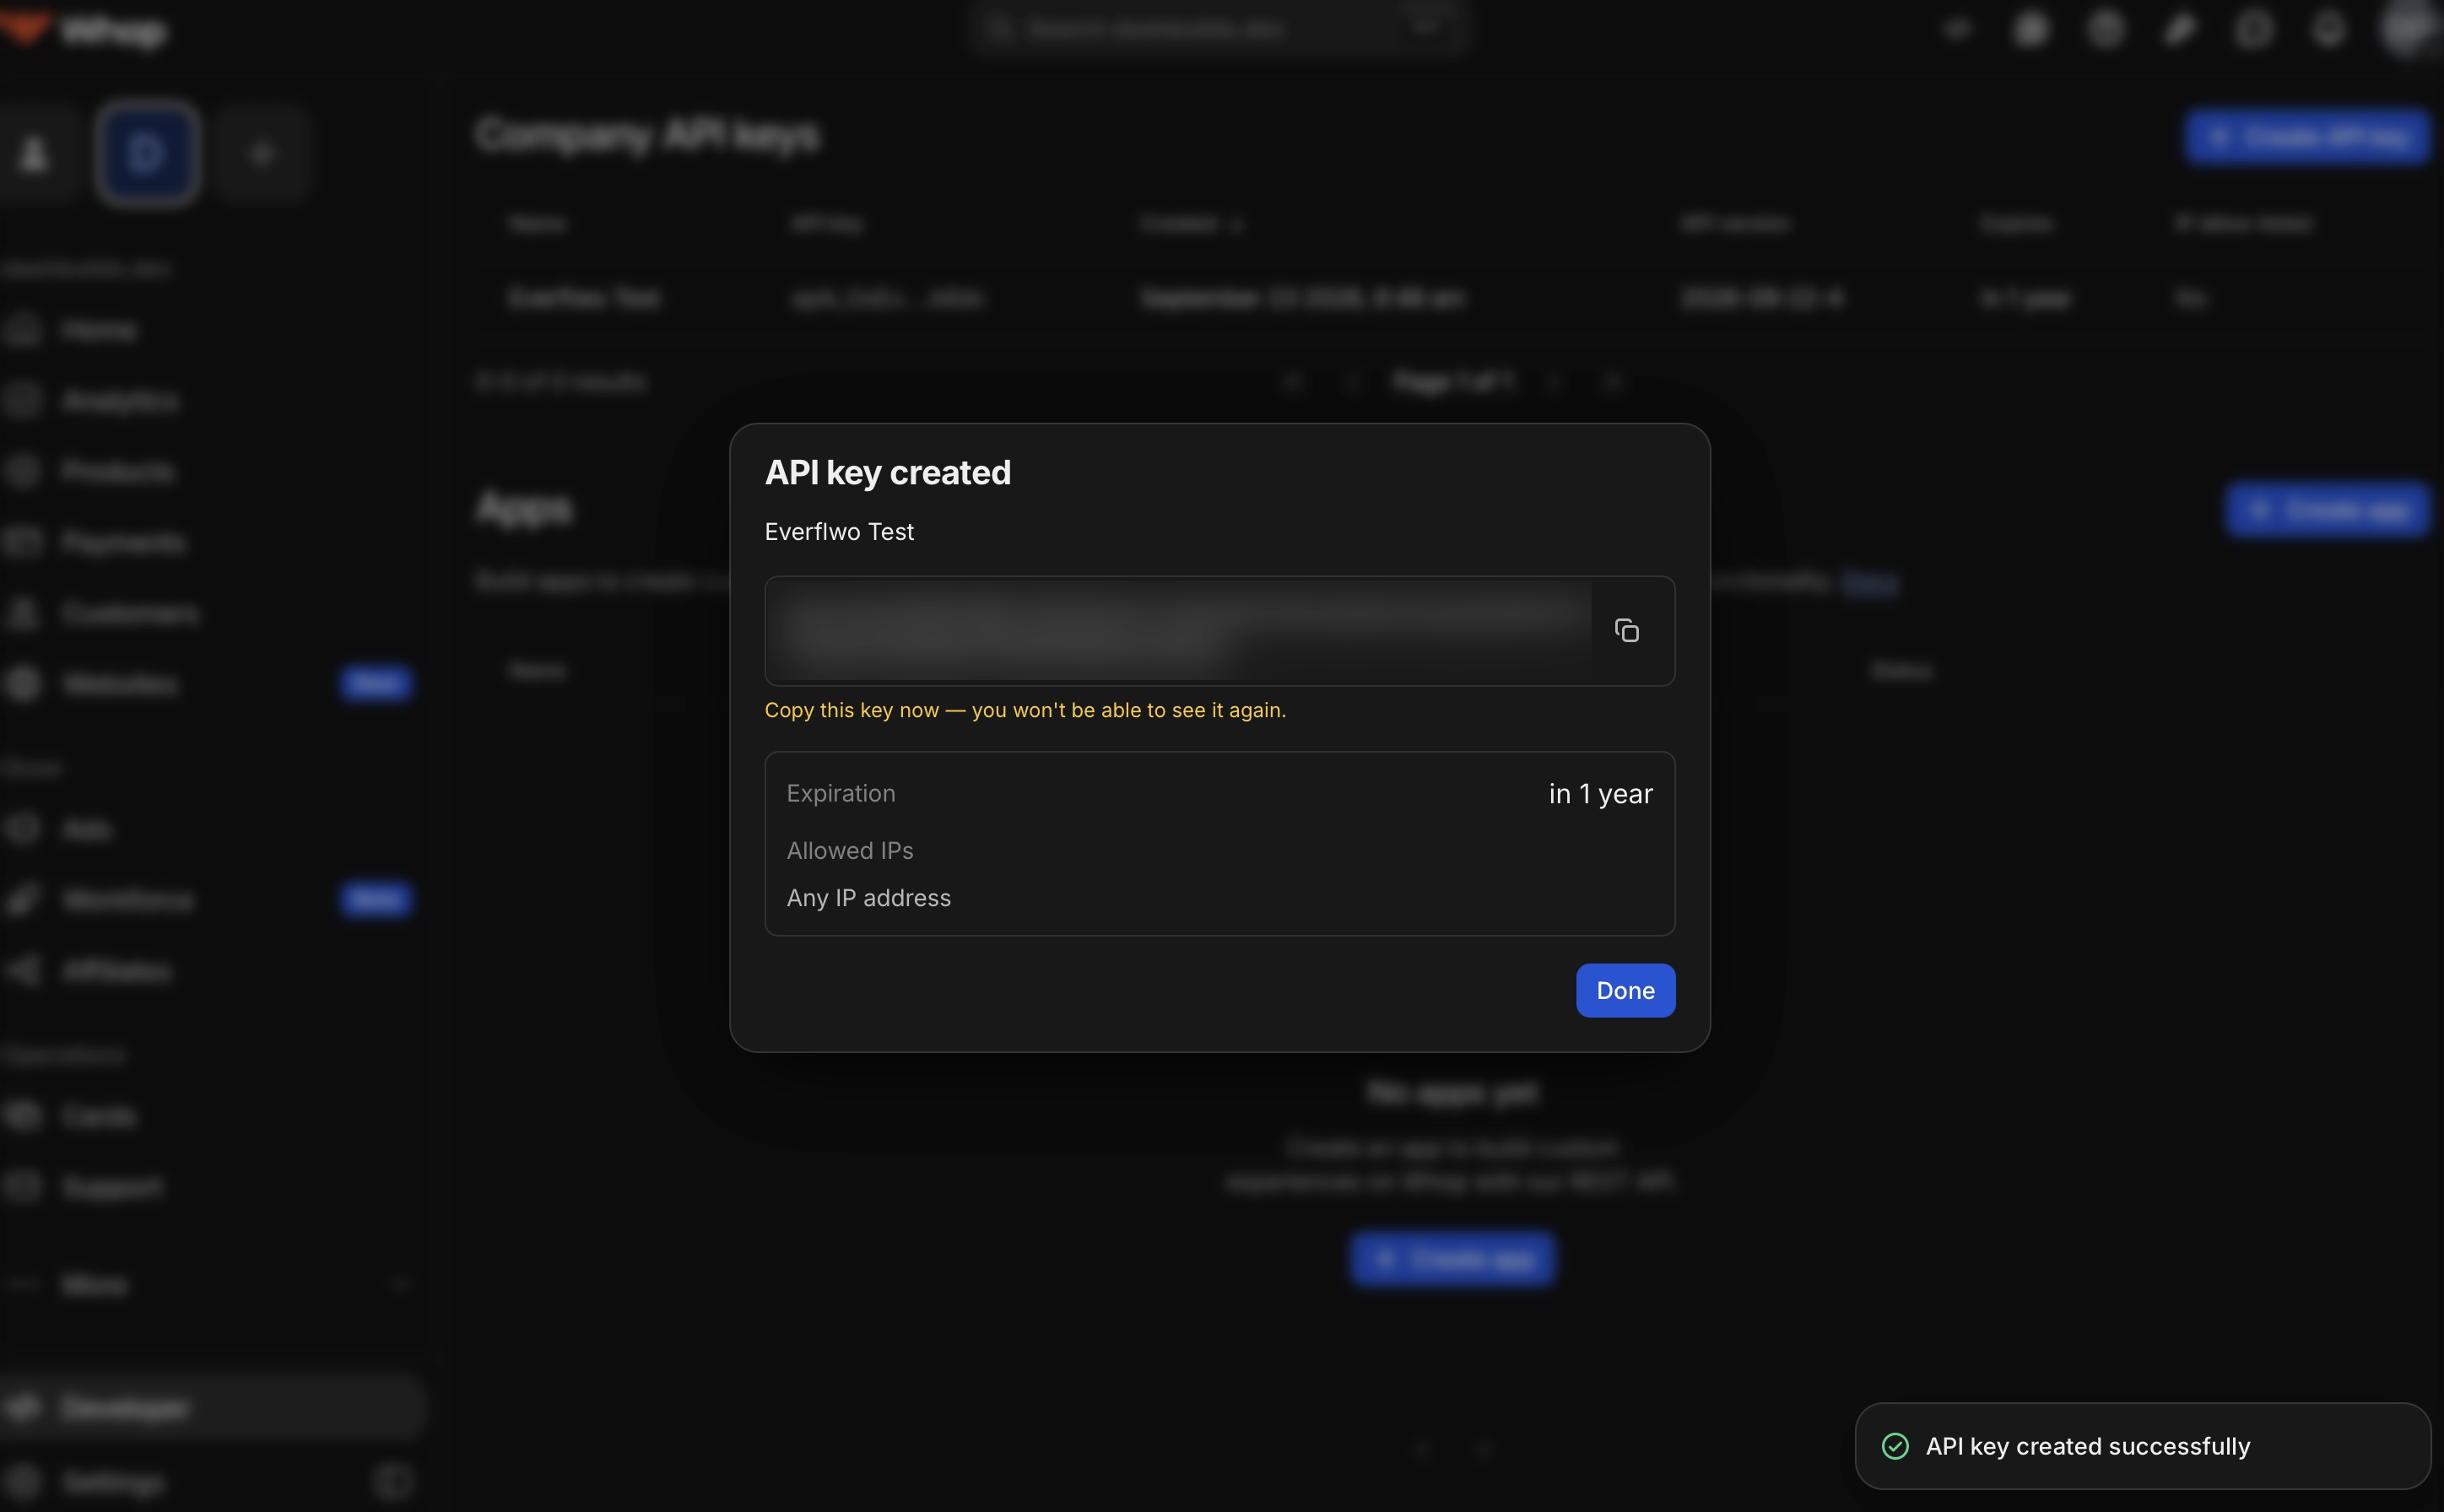
Copy the key straight away

Whop shows the value once. If you lose it, create another key rather than hunting for the old one.

5

Note your Account ID

It starts with biz_ and is the part of your dashboard URL that comes after dashboard/. This is the Account ID field in Everflow.

All five steps happen on one screen, Company API keys, which lives under Developer in the left-hand nav:

The Company API keys screen in the Whop dashboard, reached from Developer in the left-hand nav, with the Create API key button top right

Leave Expiration and IP allow-list blank

Both are optional on the create dialog, and both fail quietly months later if you fill them in. A key with an expiry date works until that date and then stops, and nothing on the Everflow side announces it. An IP allow-list refuses every request from an address you did not list. The key in the screenshots above was given a one-year expiry, which is fine for a test, but a production key should have neither set. Permissions also start at Custom with none selected across 58 categories, so event:create is something you search for, not something you will come across.

Searching event in the permissions box narrows 58 categories down to the one you need, and Permissions selected should read 1 before you create the key:

The Create API key dialog with event searched in the permissions box and event:create ticked, showing Permissions selected as 1

Keep the key server-side

Whop asks that company API keys are never put in browser code, mobile apps or public repositories. Pasting it into the Everflow integration form is fine, because Everflow stores it masked and only uses it server to server.

The value appears once, on the confirmation dialog, and cannot be retrieved afterwards:

The API key created dialog, with the key value blurred and the warning that it can only be seen once

Whop documents both in their own guides: Whop quickstart and the API keys reference.

Your Account ID is not on a settings page at all. It is the biz_ segment of the dashboard URL itself:

A Whop dashboard URL, with the Account ID visible as the biz_ segment after dashboard/

Use direct linking, not a redirect

Traffic should land straight on the landing page, where the Everflow SDK can read the URL. A redirect link will not give Whop the context it needs.

Step 1: Set up the partner that will hold the integration

Whop Ads is always configured inside the Partner Platform, so before anything else you need a partner and a user on that partner. This is true whichever way the traffic reaches you.

The traffic is your own

Media buying you run yourself. Create a partner to represent it, the way you would for Google Ads, add a user to that partner, then impersonate the user to do the setup.

The traffic is an affiliate's

The partner already exists. Either they complete the setup themselves in their own Partner Platform, or you impersonate their user and do it for them.

Either way you end up in the same place, filling in the same form. Everything that follows happens in the Partner Platform.

Step 2: Add the Whop Ads integration

In the Partner Platform, open Company Settings at the bottom of the left-hand menu.

Company Settings at the bottom of the Partner Platform menu

Choose Integrations.

The Company Settings panel with Integrations selected

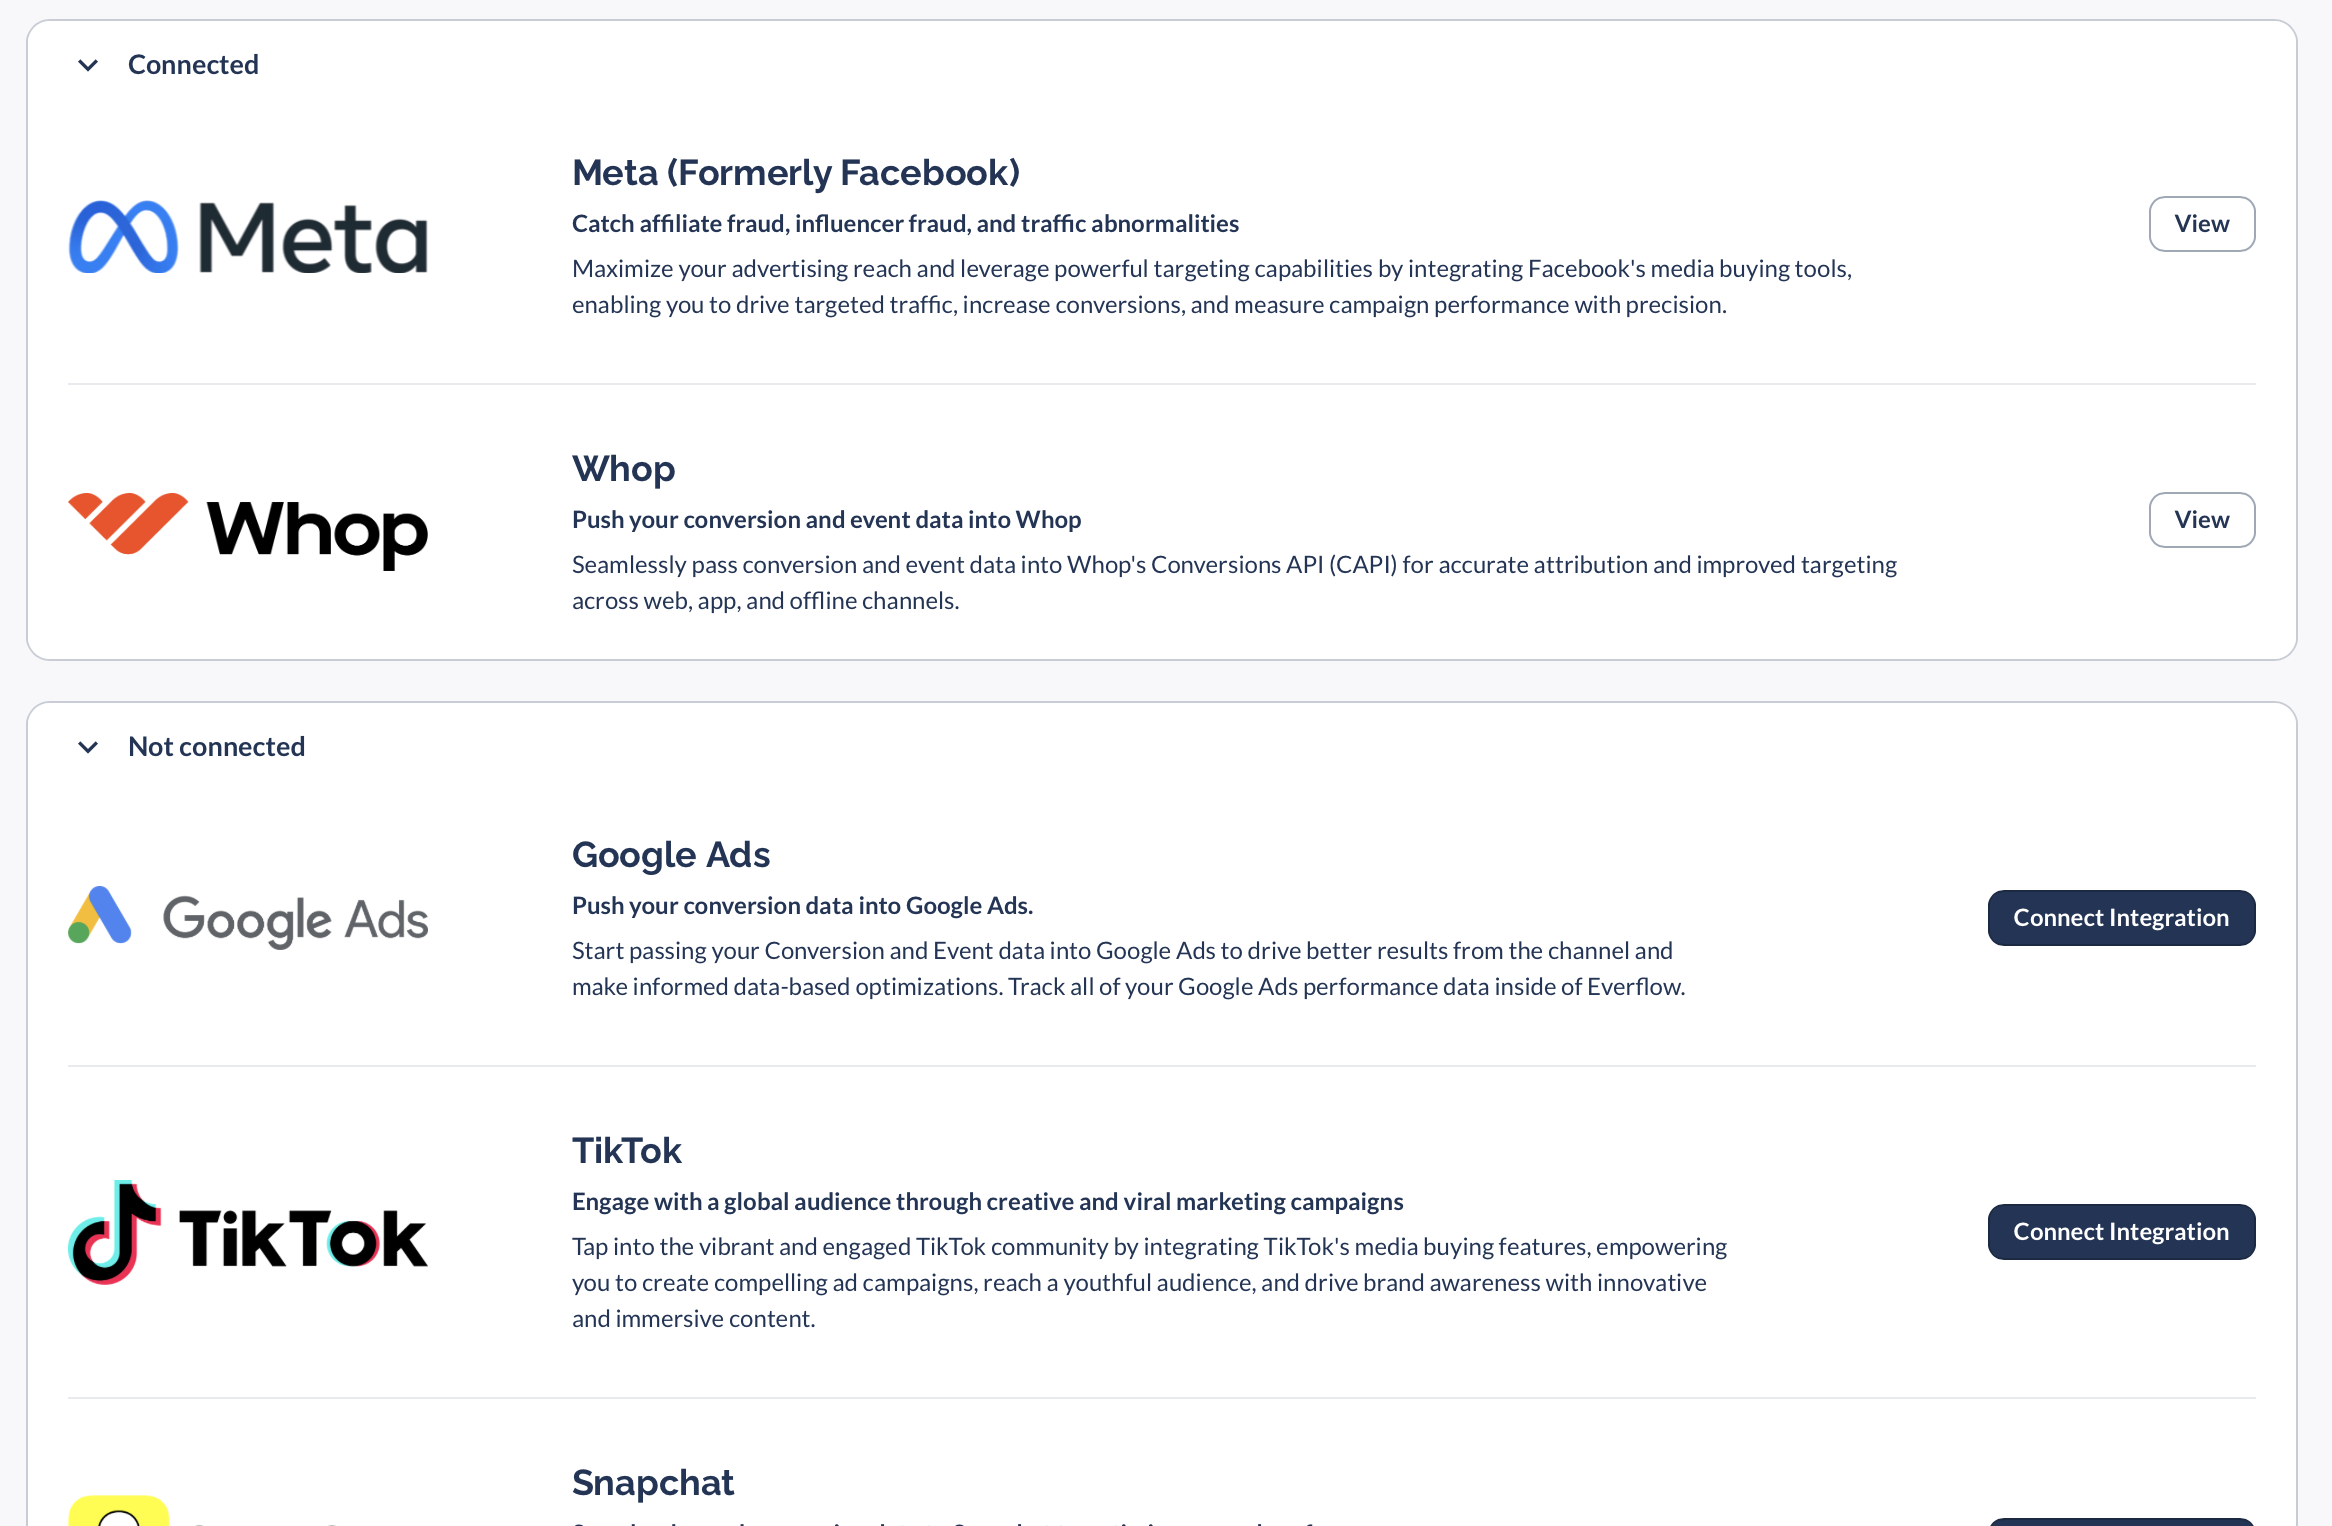
Find Whop in the list. Before it is set up it sits under Not connected with a Connect Integration button. Once it is set up it moves to Connected and the button becomes View.

The partner Integrations list, showing Whop under Connected and other platforms under Not connected

Fill in the three fields

The Whop integration form with Name, Account ID and API key, all mandatory
Whop integration fields
Name
A label for your own reference, for example Whop - Main Account. Internal only, and you can save more than one.
Account ID
Your Whop account, from the Whop dashboard. Every event is sent against it.
API key
Your Whop account API key, with the event:create scope. Stored masked.

Name each one properly

Add one integration per Whop account. The postback is chosen by this name later, so give each one something you will still recognise then.

As a network you can review what is configured at any time from Integrations > Whop > Manage, which lists each partner alongside its Whop integration and the Whop event names being sent.

Step 3: Create the postback

The integration stores the credentials. The postback is what actually sends events, and it is created back on the Core Platform by whoever runs it. Go to Partners, open the partner holding the Whop integration and choose its Postbacks tab. Postbacks you create there also appear on the offer they are attached to. For how partner postbacks work in general, see configuring partner postbacks.

FieldWhat to set
StatusActive.
DescriptionOptional, for your own reference.
Postback TypeConversion or Event. Use Conversion for a completed action, Event if you are sending a post-conversion event. CPC is not available for Whop, which is why Whop does not appear in Delivery Method when CPC is selected.
Postback LevelGlobal or Specific. Choosing Specific reveals Partner and Offer selectors, which is how most Whop postbacks are set up.
Delivery MethodWhop. The Whop fields appear underneath once you choose it.
Whop IntegrationThe integration the partner saved, chosen by its name. If the list is empty, the partner side is not set up yet.
Whop Event NameWhat happened, in Whop's terms. Pick a standard event or choose Custom.
Custom NameOnly when the event name is Custom. Build it with Add Macro and keep the resolved value to 35 characters or fewer.
Action SourceWhere the conversion happened. Defaults to Website.
External IDYour own identifier for the conversion, set with a macro such as a transaction ID or a sub ID.
ValueWhat the conversion was worth, set with a macro such as the sale amount or the payout.

A live setup usually has several of these. One Conversion postback covers the sale itself, and an Event postback is added for each step worth reporting, for example:

Postback TypeEverflow eventCustom Name sent to Whop
ConversionThe sale itself{transaction_id}=step06
EventIntake Started{event_id}=start_quiz
EventIntake Completed{event_id}=complete_quiz

Each one uses Value {payout_amount} and an External ID macro, so Whop receives a named step with a value attached rather than an unlabelled conversion.

There is no field mapping to do

Once Delivery Method is set to Whop, Everflow assembles the rest of the event itself, including the customer and context fields below.

What the network sees

Setup happens on the partner side, but as a network you do not lose sight of it. In the Core Platform, Connect > Integrations opens Manage Integrations, where the Media Buying tab lists Whop under Connected once a partner has set it up.

The Media Buying tab in the Core Platform, with Whop listed under Connected

Click View, then Manage, to see every partner using Whop alongside their integration and the Whop event names they are sending. Delivery itself is reported under Reporting > Partner Postback.

What Everflow sends for you

What is sentWhere it comes from
Account IDYour saved integration
Event name, custom name, action sourceYour postback settings
Conversion ID, time, value and currencyThe conversion itself
Email, phone, external ID, username, first and last nameThe conversion, when your setup passes them
City, state, postal code and countryThe original click
Landing page URL, referrer, IP address, user agent, language and timezoneThe click and the SDK

Send email and phone as plain text

Some Conversions APIs expect identity fields to be hashed first. Whop does not, and treats a hashed email as invalid, dropping it. That quietly removes your strongest matching signal. Pass these values as they are. The more identity fields a conversion carries, the better Whop and the destination platform can match it to a real person.

What a delivered event looks like

You can see the exact event Everflow sent on any conversion. Go to Reporting > Partner Postback and open a row to see its payload. A healthy one looks like this:

Whop event payload
{
  "account_id": "biz_XXXXXXXXXXXX",
  "event_name": "custom",
  "custom_name": "start_quiz",
  "event_id": "4f2c1ab9d07e4c8fa1b36e5d92c07a41",
  "event_time": "2026-09-16T18:33:58.000Z",
  "value": 0.0,
  "currency": "usd",
  "action_source": "website",
  "url": "https://yourbrand.com/offer?oid=1&affid=89&utm_whop=true",
  "referrer_url": "https://yourbrand.com/",
  "user": {
    "external_id": "3",
    "city": "Austin",
    "state": "Texas",
    "postal_code": "78705",
    "country": "United States"
  },
  "context": {
    "ip_address": "203.0.113.10",
    "user_agent": "Mozilla/5.0 ...",
    "language": "en",
    "timezone": "America/Chicago"
  }
}

The url field is the one to check first. It is the landing page the visitor actually arrived on, carried through from the click, and it is where utm_whop=true appears. If the URL has no context on it, Whop has nothing to route on.

Step 4: Verify both halves

Checking Everflow alone is not enough, because the Everflow half can pass while the event is discarded afterwards.

1

Click through a real tracking link

Click a real Whop ad rather than opening the page directly, so there is genuine click context to attach.

2

Fire a test conversion

Include a few customer data fields such as email and phone, then confirm it appears in your Everflow Conversion Report.

3

Check the postback went out

In Reporting > Partner Postback, confirm the row reads Success and has a payload on it.

4

Confirm it arrived in Whop

Find the event in Whop under the event name you configured. If Everflow shows the conversion and Whop does not show the event, treat it as a routing problem and start with the landing page URL.

Troubleshooting

?A postback shows Failure and its payload is empty

An empty payload next to a Failure means there was no click context to build an event from, so nothing was sent. Check that the visit actually came through Whop and that the Everflow SDK is present on the landing page.

?Conversions are in Everflow but no events reach Whop

Check that the Everflow SDK is on the landing page, since it is what captures the click context, and that the traffic reaching the page came through Whop. A conversion with no click ID and no campaign parameters has nothing for Whop to route on and goes no further, even though Everflow reports it as delivered.

?Events are rejected by Whop

Check that the API key saved on the integration still carries the event:create scope, and that the Account ID on the integration matches the account you are looking at in Whop.

?The custom event name is being cut off

Custom event names are limited to 35 characters. If you build the name from macros, check the length of the value those macros resolve to, not the length of the macro text.

?The same conversion appears more than once

Everflow sends an idempotency key with every delivery attempt, and Whop stores a given event name and conversion ID pair only once, so a retry is not counted twice. If you see genuine duplicates, check whether more than one postback is set to send the same conversion.

?Older conversions are not being accepted

Whop rejects events whose conversion time is more than 28 days old. This normally only matters when replaying historical conversions or testing with an old record.

What this integration does not cover

Do not report sales that Whop itself processed

Whop records its own checkouts, subscriptions and trials server-side. Sending those back through this integration double counts them. Use it for conversions happening on your own offers and landing pages.

This integration sends conversion events. It does not touch the rest of the Whop product, and Everflow does not hold Whop's own identifiers for users, members, memberships, products or plans. Whop memberships, products and plans, payments and checkout, and Whop webhooks are all outside its scope.

Next in This Series