
Overview
This guide covers how to set up conversion tracking between ClickMagick and Everflow. There are two common use cases depending on your role:
Prerequisites
Use Case 1: Sending ClickMagick Conversions to Everflow
This setup is for advertisers who use ClickMagick to track and optimize their traffic. When a conversion occurs, ClickMagick fires a webhook (postback) to Everflow so the conversion is recorded in your Everflow reporting.
Step 1: Configure the Default Landing Page URL
Set your Offer's landing page to pass Everflow's Transaction ID to ClickMagick so conversions can be attributed back correctly.

Example landing page URL:
https://YOUR_CLICKMAGICK_DOMAIN.com/?s2={transaction_id}Step 2: Set the Conversion Tracking Method
On the same Tracking & Controls tab, set the Conversion Tracking Method to Server to Server Postback. This tells Everflow to expect conversion data via postback URLs rather than pixel-based tracking.
Step 3: Configure ClickMagick Webhooks
Now set up ClickMagick to fire postbacks to Everflow when conversions occur. In your ClickMagick dashboard, follow the webhook setup process described in ClickMagick's webhook documentation.
Sale Conversion Postback
This is the primary postback that fires when a sale is completed. Use the following Everflow endpoint URL in your ClickMagick webhook configuration:
https://www.TRACKING_DOMAIN.com/?nid=XX&transaction_id=[cmc_tid]&amount=[cmc_amt]Checkout Hit Postback (Optional — Advertiser Event)
If you also want to track checkout events (before a full sale), set up an Advertiser Event in Everflow and use this postback format:
https://www.TRACKING_DOMAIN.com/?nid=XX&aid=X&adv_event_id=X&transaction_id=[cmc_tid]Setting Up in ClickMagick
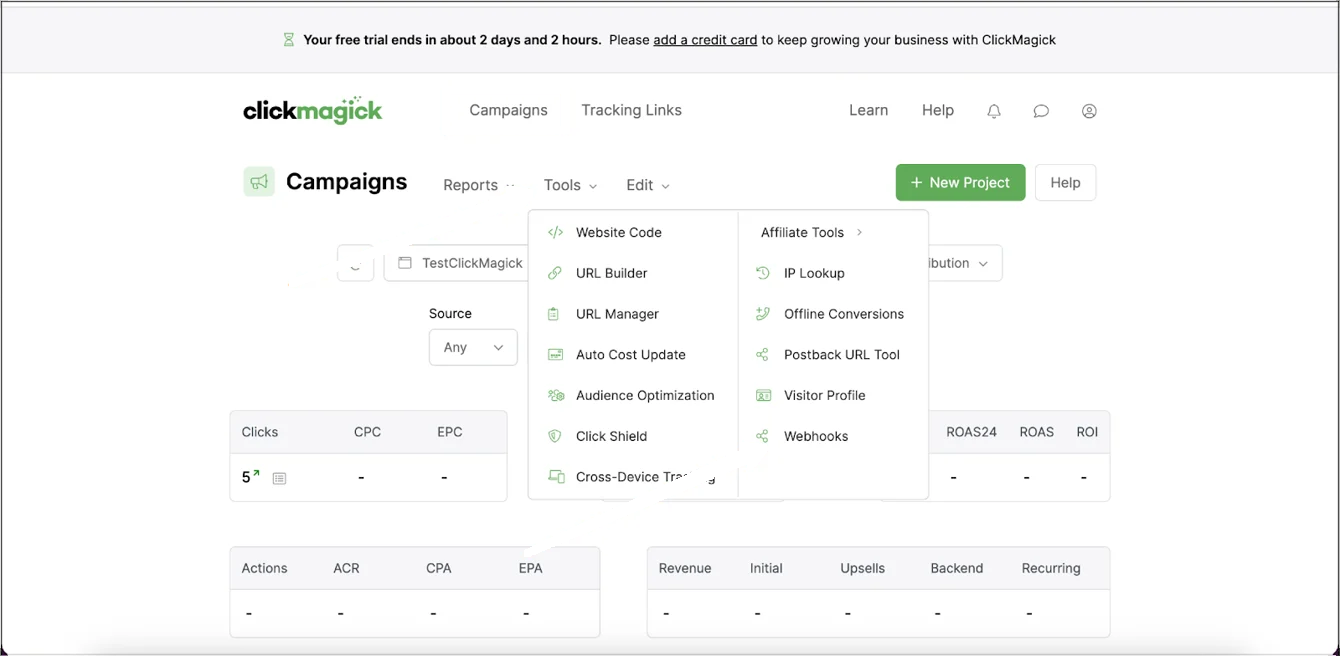
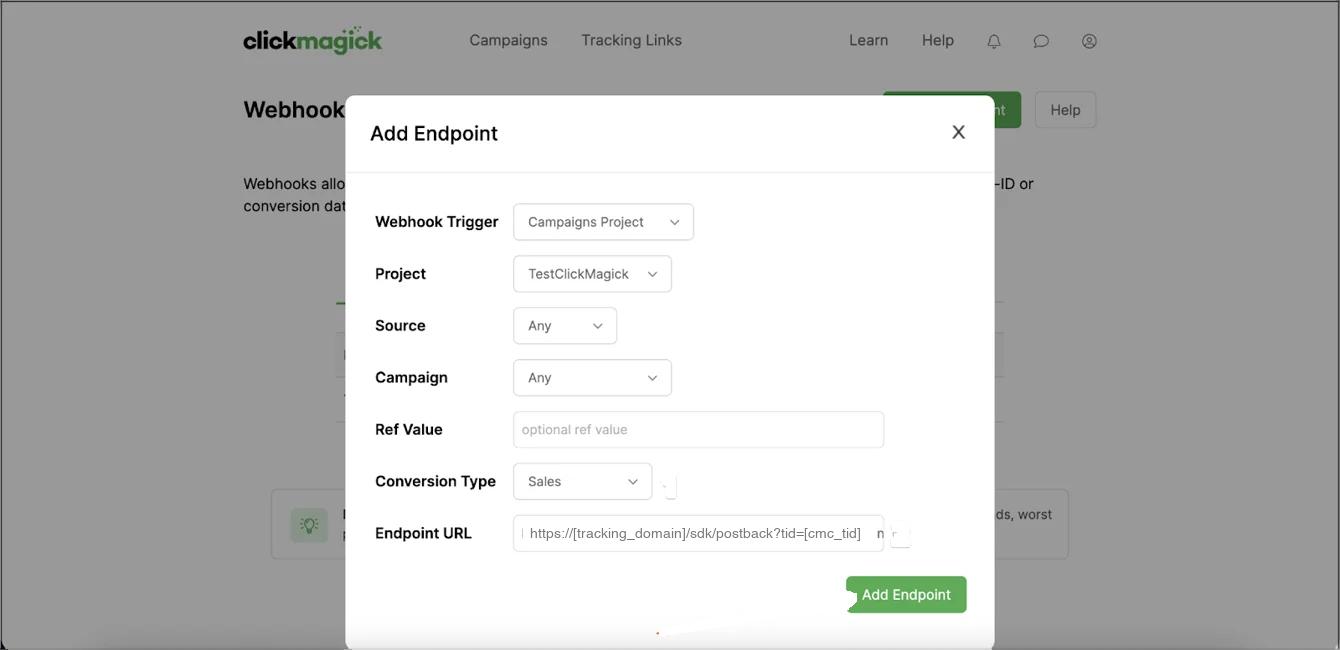
Once you have your Everflow postback URLs ready, configure them in ClickMagick. Navigate to Campaigns → Tools → Webhooks, click + Add Endpoint, set the Conversion Type to Sales, and paste your Everflow postback URL.
For the tracking link, use the URL Builder to append ?cmc_tid={click_id} to your landing page URL along with your UTM parameters. See ClickMagick's native ads integration guide for detailed steps.
Step 4: Test the Integration
Use Case 2: Affiliate Using ClickMagick With an Everflow Network
This setup is for affiliates who promote offers on an Everflow-powered affiliate network and use ClickMagick to track their own campaigns. The goal is to pass ClickMagick's tracking ID through Everflow so that when a conversion occurs, Everflow fires a postback to ClickMagick with the conversion data.
This is a 3-step process. For full details, see ClickMagick's affiliate network tracking guide.
Step 1: Add ClickMagick Tracking Code to Your Landing Page
Paste the ClickMagick tracking code on the landing page you are sending traffic to. This code captures the ClickMagick visitor ID for attribution.
Step 2: Build Your Affiliate Link With ClickMagick's Affiliate Link Builder
Use ClickMagick's Affiliate Link Builder and select Everflow as the affiliate platform. This automatically appends sub1=[cmc_vid] to your Everflow affiliate link, which passes the ClickMagick visitor ID into Everflow's sub1 parameter.
Your modified affiliate link will look something like:
https://www.YOUR_TRACKING_DOMAIN.com/click?pid=XX&oid=XX&sub1=[cmc_vid]Step 3: Configure the Postback URL in Everflow
Get your custom Postback URL from ClickMagick's Postback URL Tool (select Everflow as the platform). Then paste this URL into Everflow's partner postback configuration.
The ClickMagick postback URL format:
https://www.clkmg.com/api/s/post/?uid=XXXXXX&s1={sub1}&amt={payout_amount}The uid is unique to your ClickMagick account. The {sub1} and {payout_amount} macros are Everflow tokens that pass back the ClickMagick visitor ID and conversion amount.

Everflow Tracking Tokens
These are the Everflow macros you can use in postback URLs. ClickMagick (or any postback receiver) will receive these values when Everflow fires the postback.
ClickMagick Token Reference
These are the ClickMagick tokens used in webhook endpoint URLs (Use Case 1) and postback URLs (Use Case 2).
Troubleshooting
Verify that the s2 parameter is being passed in your landing page URL. Check the ClickMagick click log to confirm the s2 value is populated with a valid Everflow Transaction ID. Also ensure the Conversion Tracking Method on the Offer is set to Server to Server Postback.
Make sure you are using the [cmc_amt] token in your webhook endpoint URL (Use Case 1) or {payout_amount} in the postback URL (Use Case 2). If ClickMagick does not have the sale amount, the value will be empty.
Confirm that the affiliate link was built using ClickMagick's Affiliate Link Builder with Everflow selected as the platform. The link must include sub1=[cmc_vid]. Also verify that the postback URL in Everflow's partner settings uses the correct uid from the affiliate's ClickMagick account.
Check that you are using the correct token for each use case. Use Case 1 should use [cmc_tid] (ClickMagick's click ID) mapped to Everflow's transaction_id parameter. Use Case 2 should use {sub1} (Everflow macro) which contains the ClickMagick visitor ID.


