
Overview
In this article, you will learn about Feeds, a feature that allows you to add and customize integrations with demand partners (Advertisers). Feeds enable you to pull in offers from your advertisers via API.
Direct Linking + Advertiser Feeds: Not Recommended
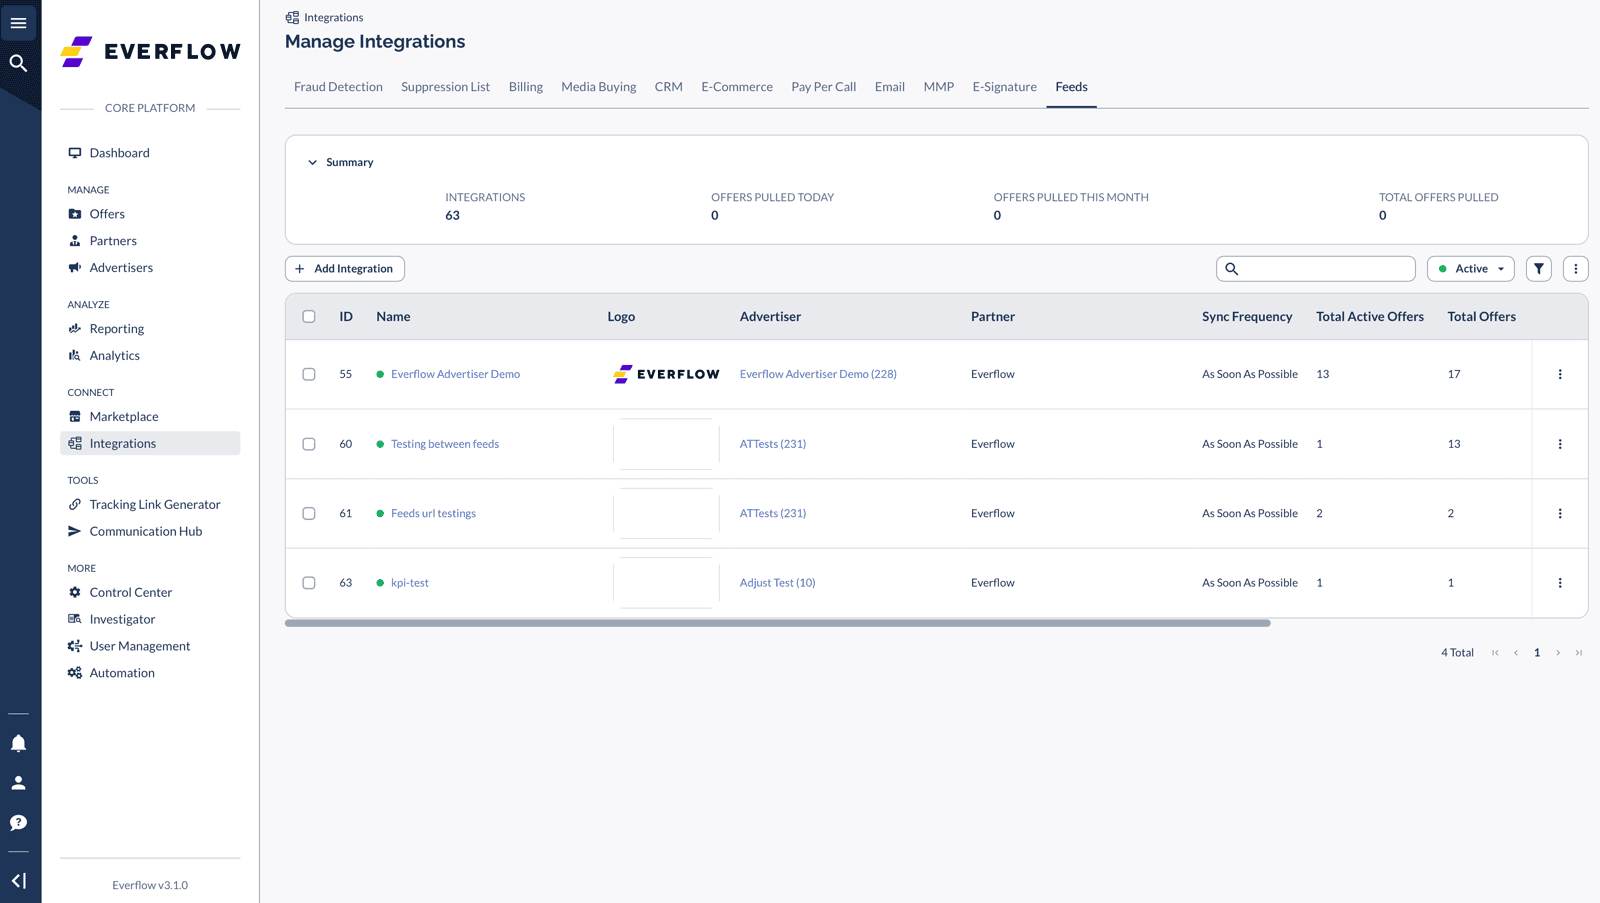
Managing Advertiser Feeds
Viewing an Integration
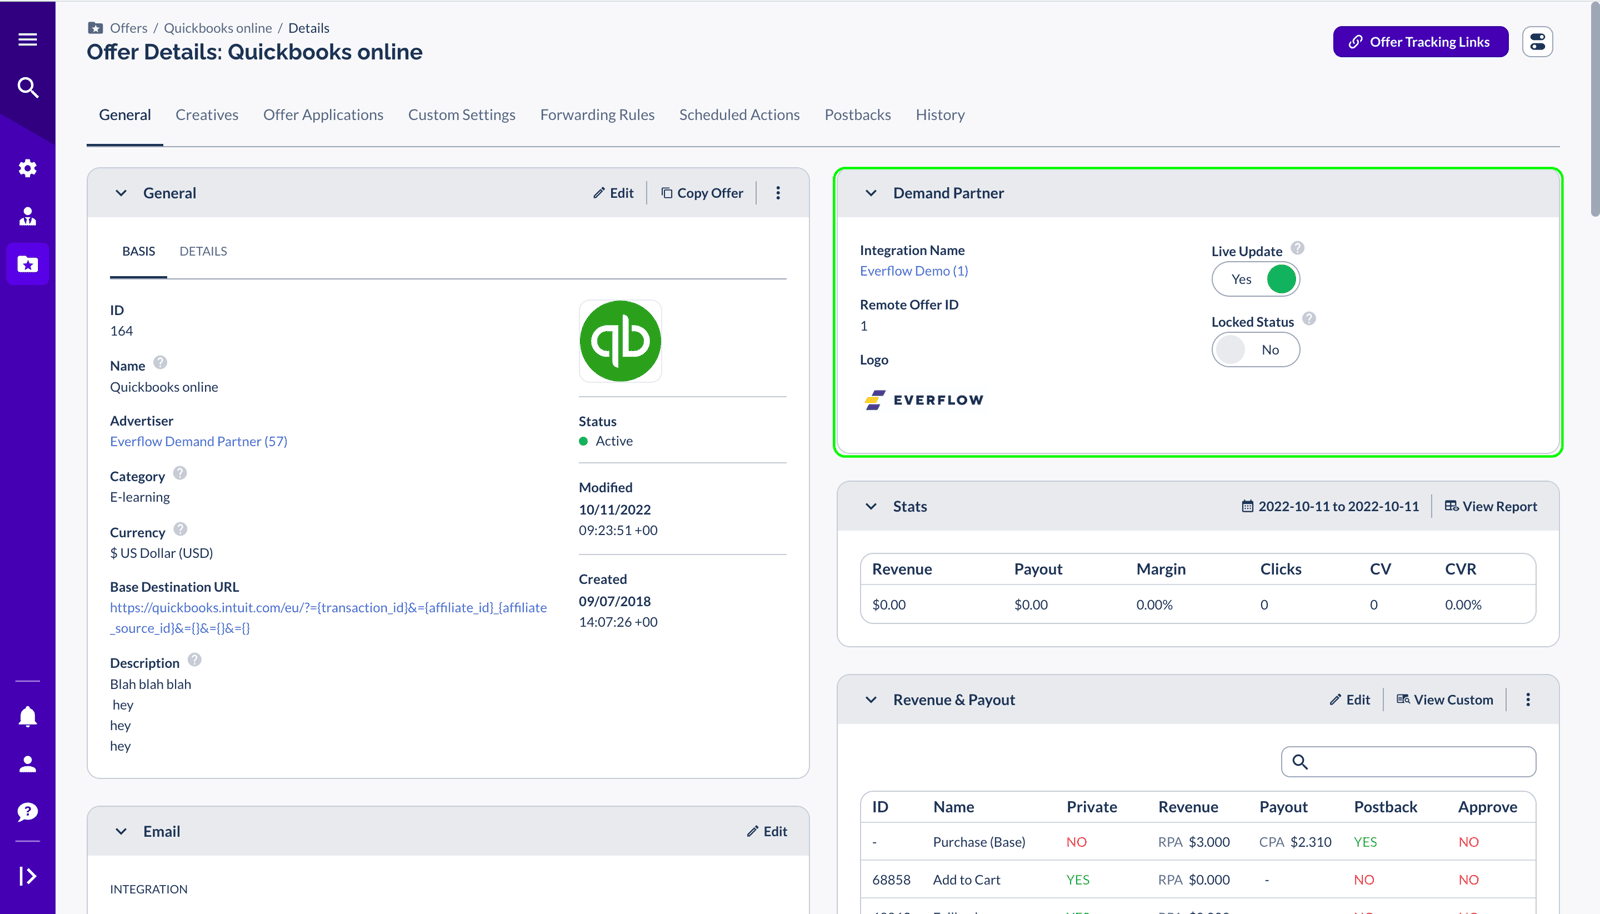
Once you've selected an integration to view, you will see a full overview of the integration and its settings.
Once you've selected an integration to view, you will see a full overview of the integration and its settings.

Should You Use Advertiser Feeds?
- Remember to configure Field Locking if you plan to customize any offer settings (see Controls section below)
- You'll still need to set up conversion tracking (postbacks) for each advertiser
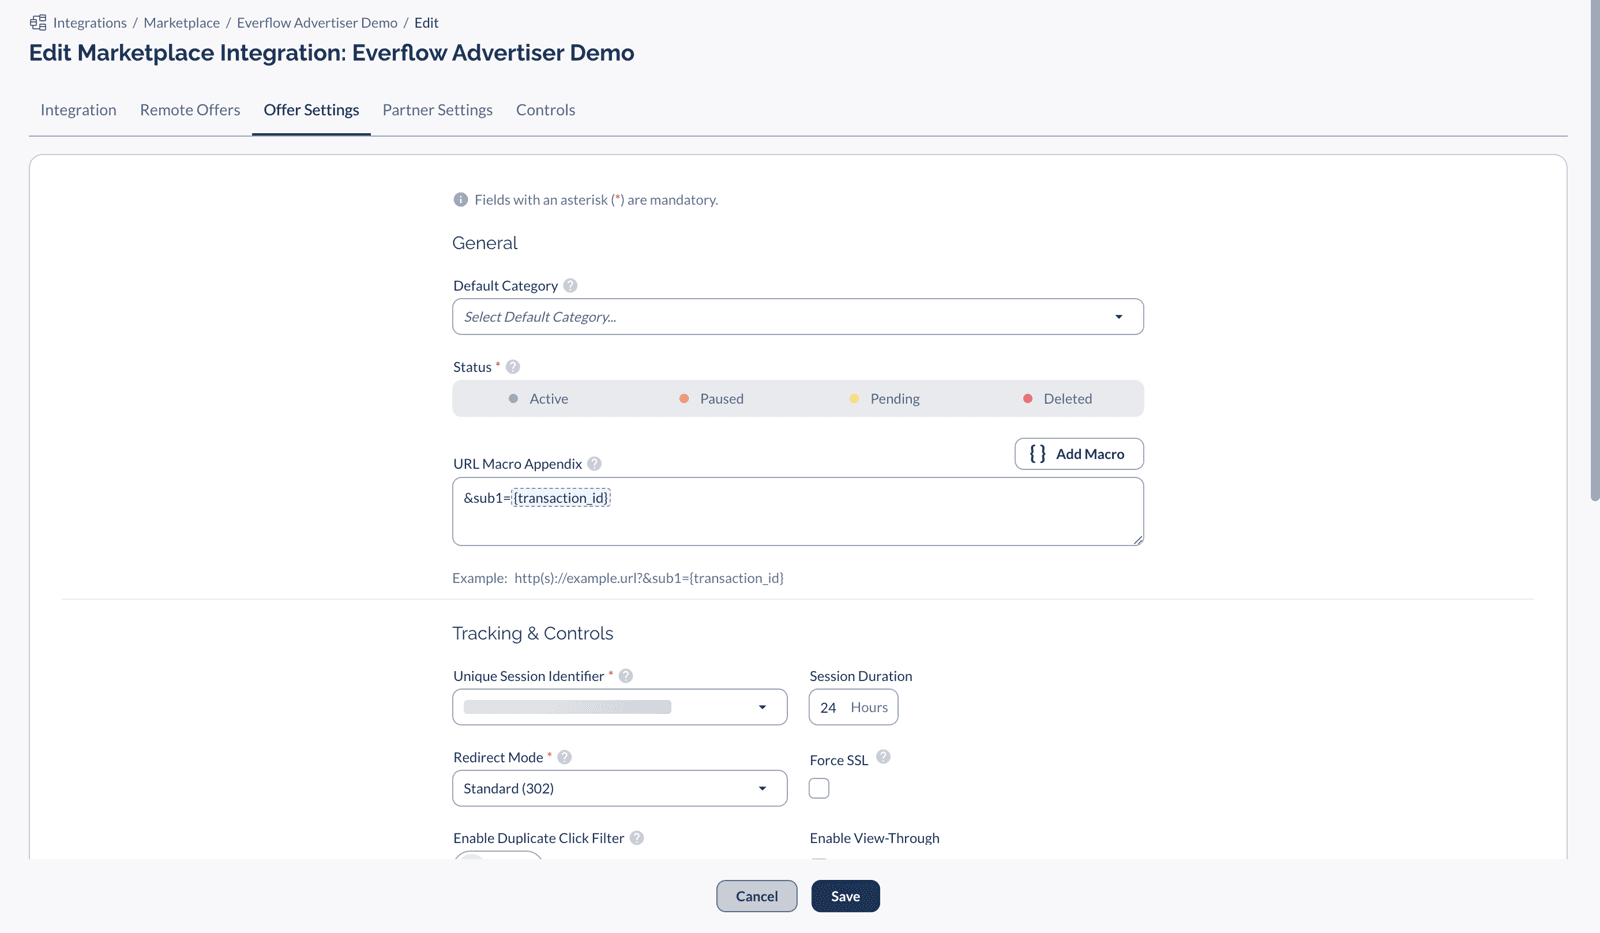
- Use the URL Macro Appendix to append tracking parameters to all ingested offers
- Direct Linking requires manual configuration: Feed ingestion strips critical tracking parameters that must be manually re-added
- Feed syncs will overwrite customizations: Unless you use Field Locking, your custom settings reset on every sync
- Small catalogs are faster to set up manually: The time spent configuring Feeds + Field Locking exceeds manual setup time
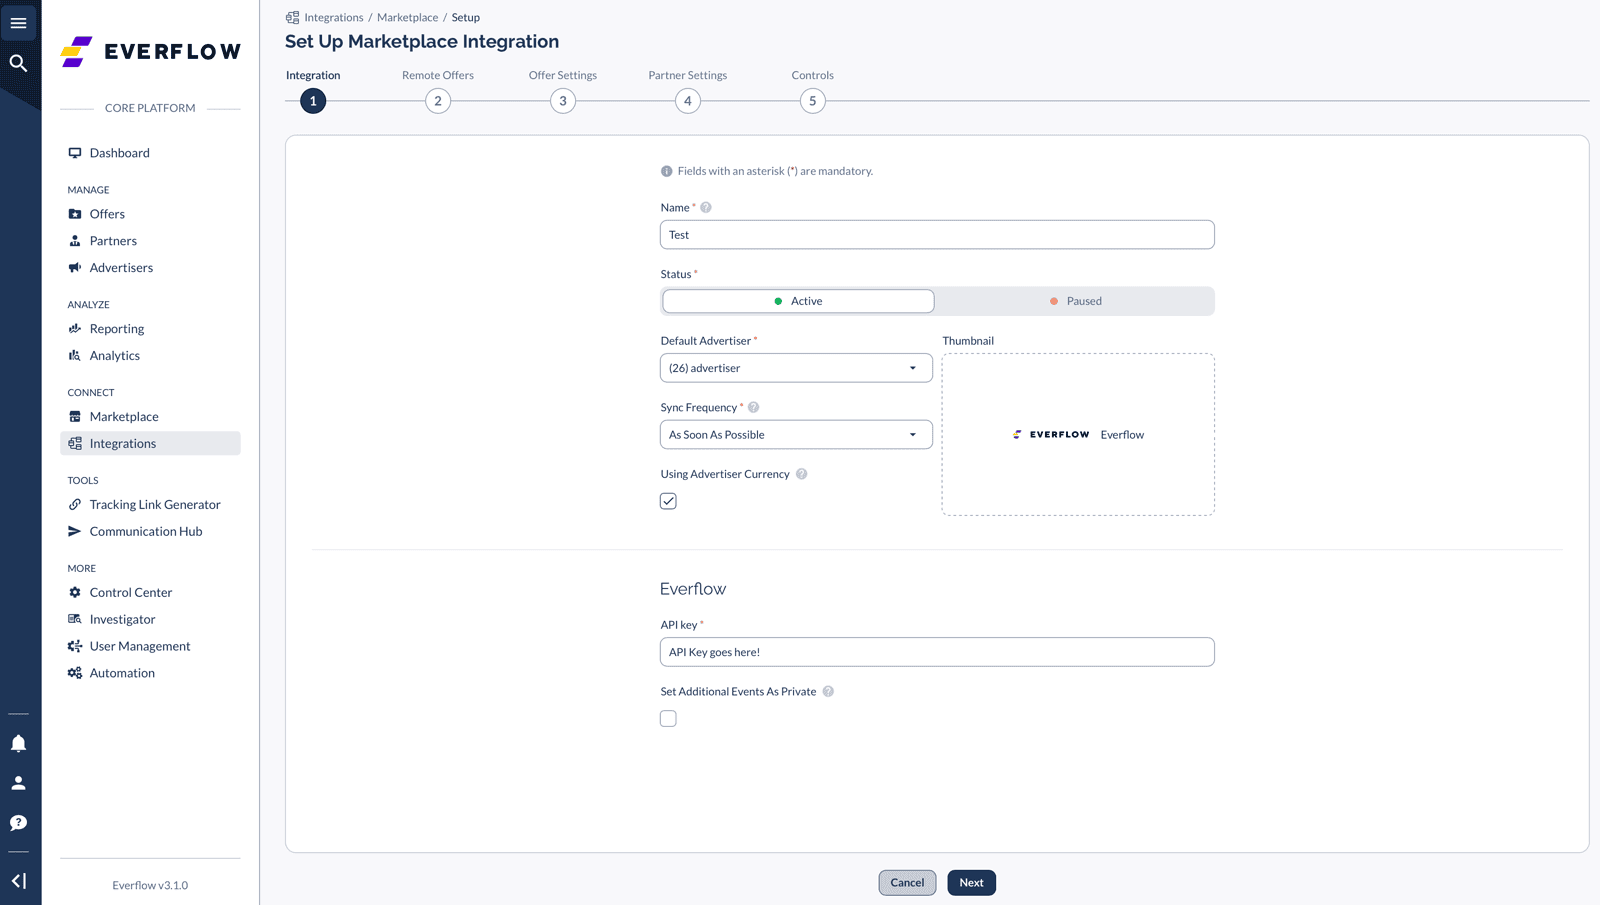
Adding an Integration

Everflow-to-Everflow Feed Set-Up
Even with Everflow-to-Everflow Feed integration, you still need to pass the transaction ID through a sub-parameter and place an advertiser postback with the transaction ID being passed back.

• Transaction ID must pass through a sub-parameter: Update your URL Macro Appendix to include
sub1={transaction_id} (or another sub of your choice)
• Advertiser Postback is required: Your advertiser postback must pass the TID back:
https://yourtrackingdomain.com/?nid=###&transaction_id={sub1}
• Direct Linking URLs need special handling: If the advertiser has Direct Linking enabled, you must manually edit each offer's Default Landing Page URL after ingestion to add
&oid={offer_id}&affid={affiliate_id}
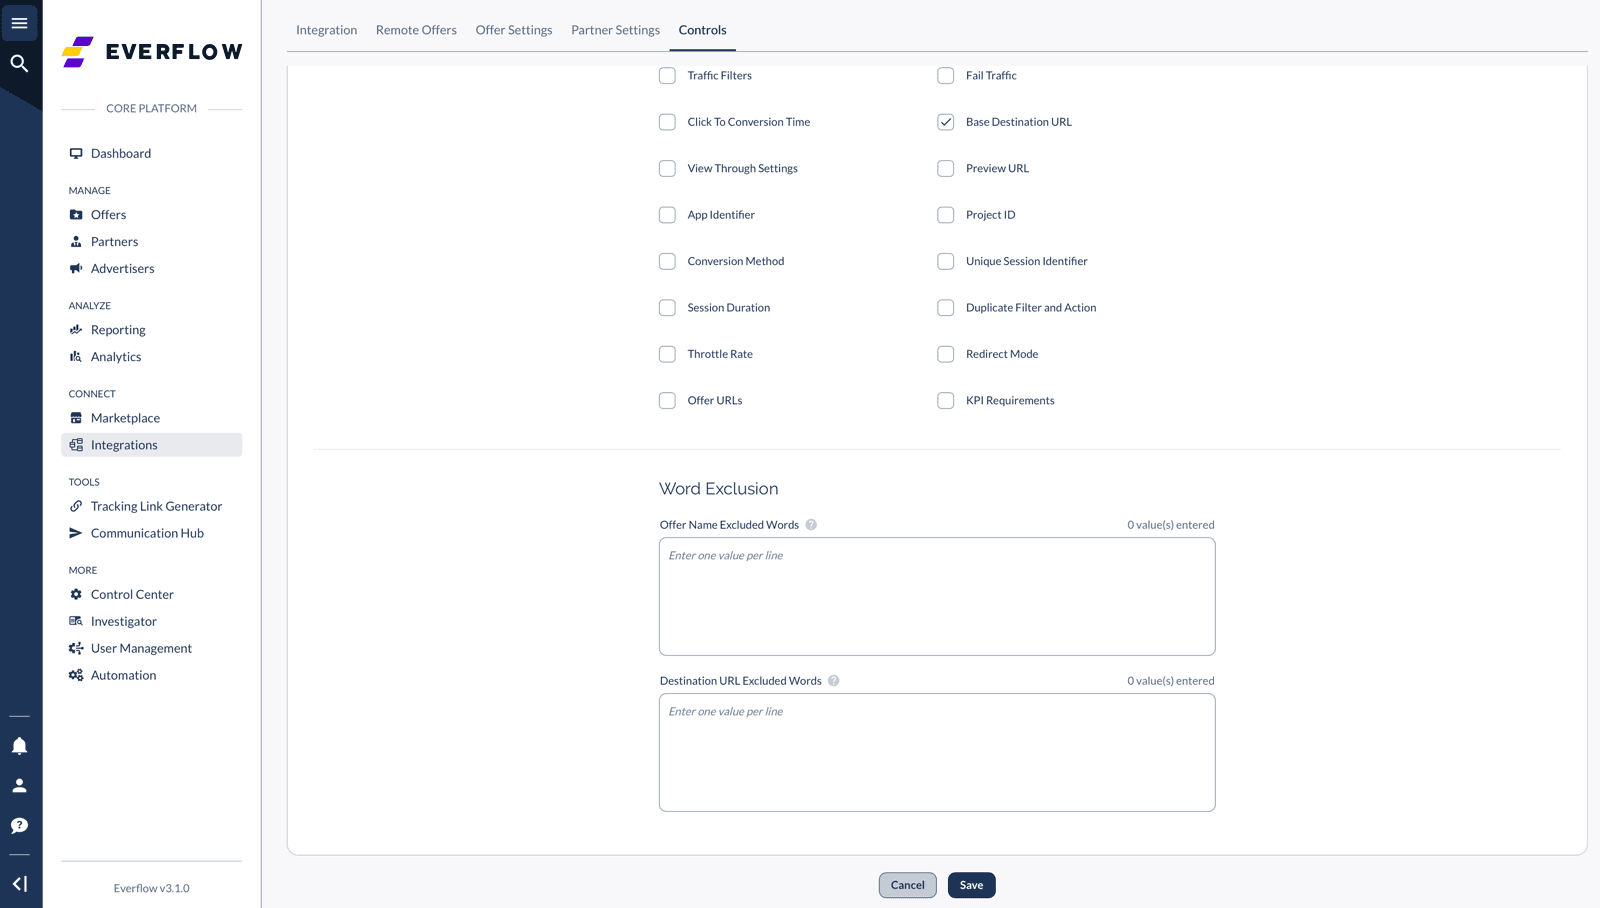
• Enable Field Locking: In the Feed's Controls section, lock the "Default Landing Page URL" field to prevent syncs from erasing your manual edits
Alternative approach: If your advertiser uses Direct Linking, consider setting up offers manually instead of using Feeds. This avoids the parameter stripping issue and ensures proper tracking from the start.
More about Advertiser Postbacks: Accessing & Editing S2S Postback URLs →
Direct Linking guide: Deep Linking Setup Guide →
For instance, you can update the URL Macro Appendix to sub1={transaction_id} (or another sub-parameter of your choosing). Once the URL Macro Appendix is set up, your advertiser postback should look like this:
https://yourtrackingdomain.com/?nid=###&transaction_id={sub1}
This postback passes back the appropriate sub value, in this case, the transaction ID.
More about Advertiser Postbacks can be found here - [CLICK HERE]
If both you and the advertiser are using Everflow, you can easily set up an advertiser feed within the platform.
Here is how to create an Everflow-to-Everflow advertiser feed:
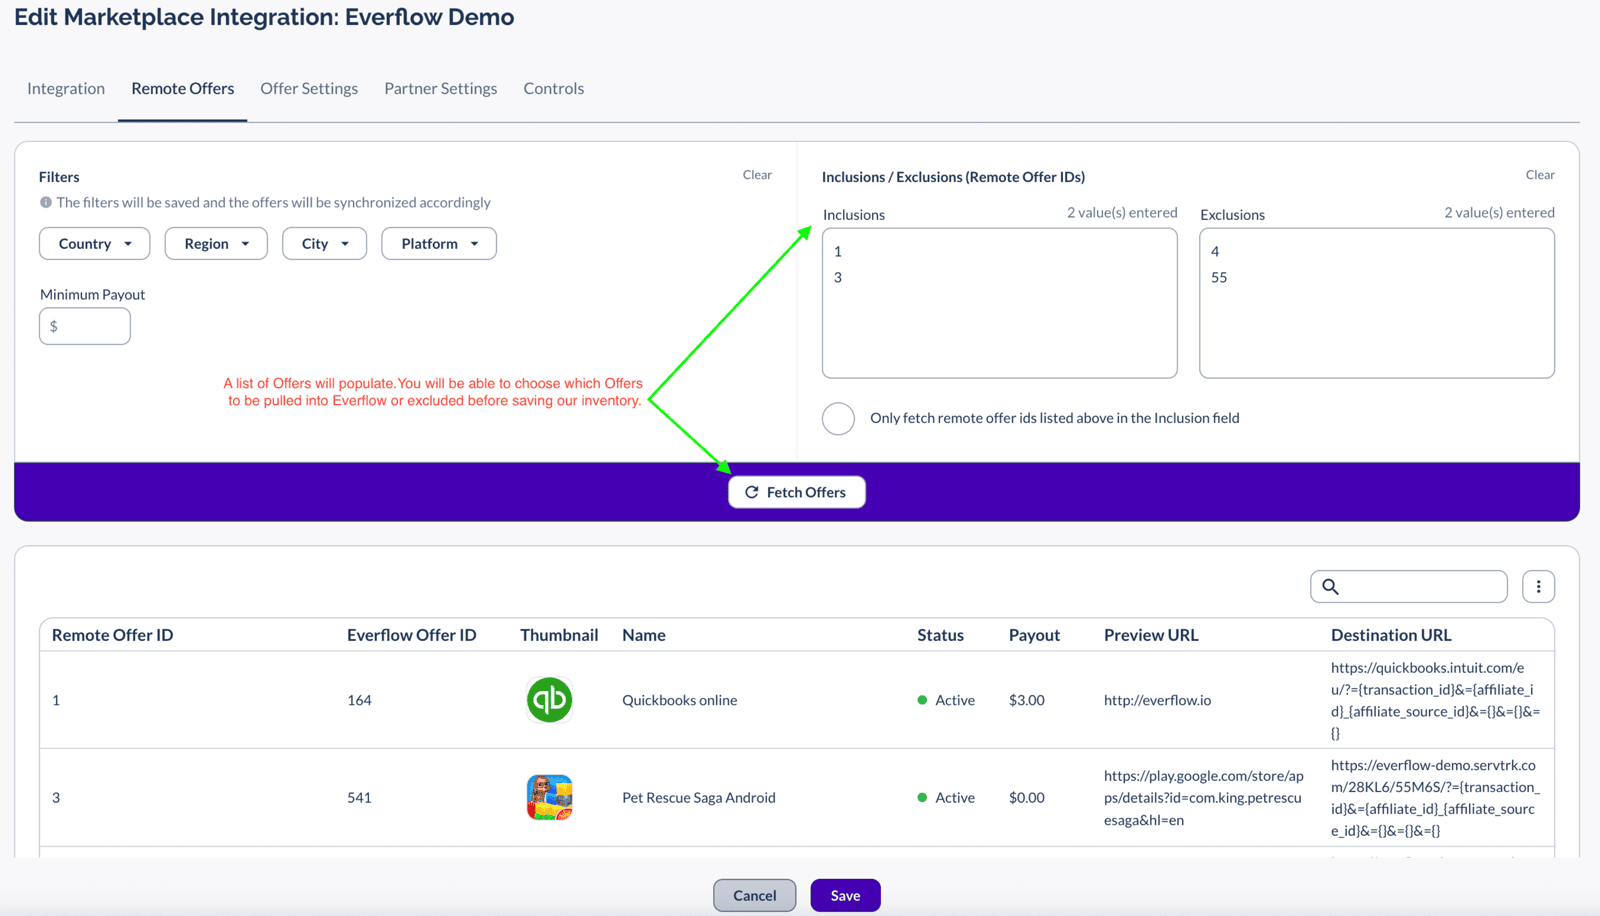
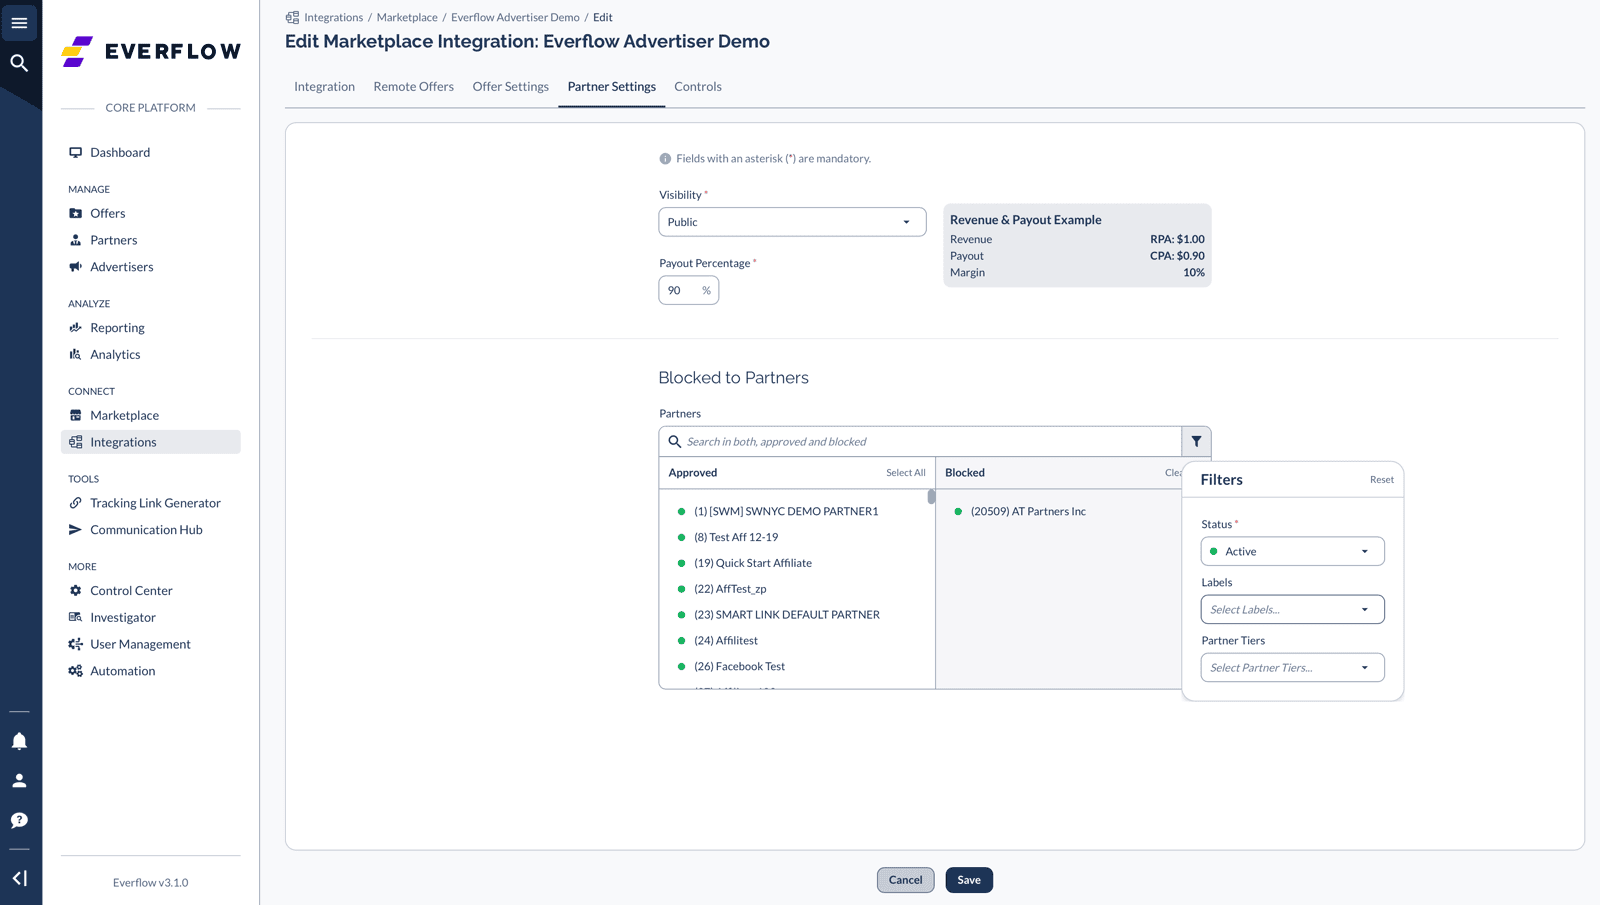
Follow the on-screen prompts for setting up Advertiser Feeds:
- Integration
- Remote Offers
- Offer Settings
- Partner Settings
- Controls
Managing Settings on Existing Offers
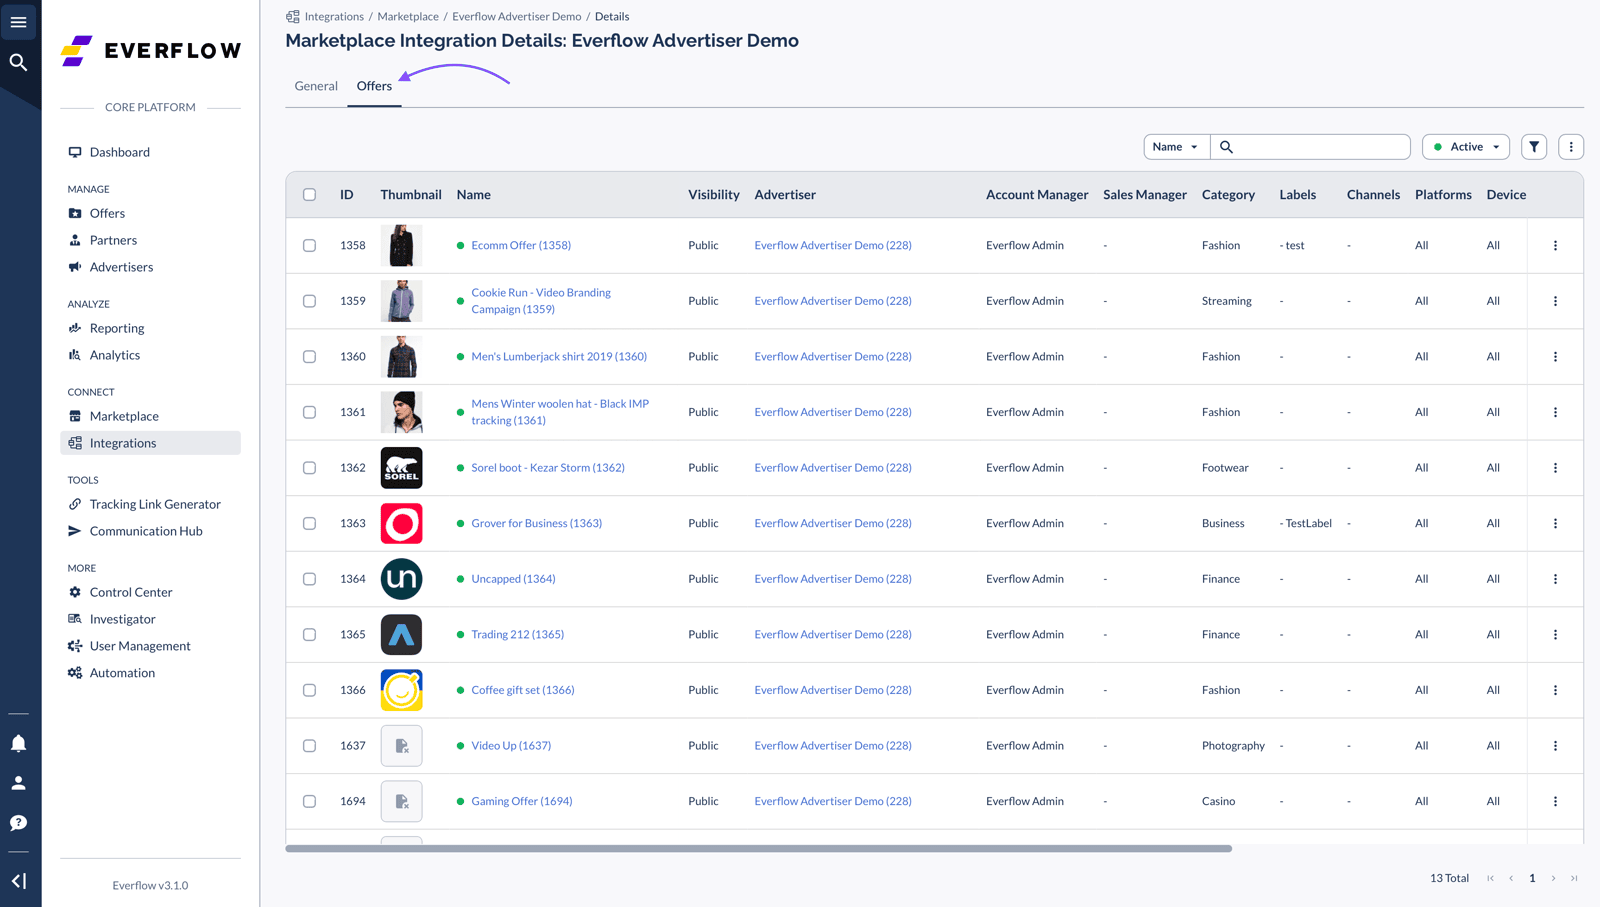
An Offer that is added via Advertiser Feeds will have a Demand Partner card displayed on its Offer page, as shown below, including:
- Integration Name
- Logo
- Remote Offer ID
- Status of integration with demand partner
$50 payout$75$50 payout$75 and lock the Payout field- Go to Integrations → Feeds and click the integration you want to configure
- Click Edit and navigate to the Controls tab
- Scroll to the Field Locking section
- Toggle ON the locks for any fields you plan to customize (Payout, Default Landing Page URL, Status, etc.)
- Click Save to apply the changes
When Live Update is enabled, the Offer status will be remotely updated with each sync.
When Locked Status is enabled, the status of the Offer (Active, Paused, Pending, Deleted) will not be updated with each sync.
Troubleshooting Advertiser Feeds
Likely Causes:
- Missing Advertiser Postback: Feeds only pull offer data, not conversion tracking. You must still set up an Advertiser Postback manually.
- Transaction ID not passed: For Everflow-to-Everflow feeds, ensure you're passing
{transaction_id}through a sub-parameter in the URL Macro Appendix and back through the postback. - Wrong NID: Verify the Network ID (NID) in your advertiser postback matches your actual Network ID.
Cause: Field Locking is not enabled for the customized fields.
Fix:
- Go to Integrations → Feeds and select your integration
- Click Edit → Navigate to Controls tab
- Scroll to Field Locking section
- Toggle ON locks for every field you've customized (Payout, Default Landing Page URL, Status, etc.)
- Click Save
Cause: Feed ingestion strips query parameters from Direct Linking URLs. The required
&oid=OFFER_ID&affid=AFFILIATE_ID parameters that the JavaScript SDK needs are missing.
Fix:
- Option 1 (Recommended): Set up Direct Linking offers manually instead of using Feeds. This ensures proper URL structure from the start.
- Option 2 (If you must use Feeds):
- Configure the URL Macro Appendix in Step 3 (Offer Settings) to append
&oid={offer_id}&affid={affiliate_id} - Enable Field Locking for "Default Landing Page URL" in the Controls section
- Manually verify each offer's URL includes these parameters
- Configure the URL Macro Appendix in Step 3 (Offer Settings) to append
Likely Causes:
- Parameters not passed to postback: Your advertiser's postback must include the same sub-parameters that were in the original tracking link.
- Direct Linking parameter loss: With Direct Linking, parameters may not persist across form submissions unless properly captured by the Click Script.
- Cookie accessibility issues: If the conversion occurs on a different subdomain than where the click was tracked, the First-Party Cookie may not be readable.
- Verify your Advertiser Postback includes all sub-parameters:
&sub1={sub1}&sub2={sub2}etc. - For Direct Linking across subdomains, use
EF.configureto set cookies at the top-level domain - Check that Word Exclusions in Feed settings aren't accidentally stripping parameter names from URLs
Cause: Your Feed configuration is set to auto-activate new offers.
Fix:
- Go to Integrations → Feeds and select your integration
- Click Edit → Navigate to Offer Settings tab (Step 3)
- Change "Initial Offer Status for New Offers" to Pending or Paused
- In Partner Settings tab (Step 4), set "Visibility for new offers" to Private or Approved Partners Only
- Click Save
Cause: This is normal behavior. Feed synchronization runs on your configured schedule (hourly, daily, etc.) and updates the "modified" timestamp even if no actual data changed.
Solution: This doesn't indicate a problem. If you want to see only your manual changes:
- Disable Remote Update in the Feed's Controls section to stop automatic syncing
- Use Field Locking to prevent specific fields from being touched during syncs
- Filter your offer history logs by user (your username vs. "System" for automated changes)
Cause: This is a known limitation. Advertiser Feeds do not support automatic syncing of Email and HTML creative types.
Workaround:
- Manually add Email and HTML creatives to your offers after they're ingested
- Request these assets directly from your advertiser
- Upload them through the standard offer creative management interface


