
Overview of ClickBank Integration
This guide will walk you through the ClickBank Integration, which will allow you to track Conversions from ClickBank back to Everflow.
Click here for the Clickbank Hoplink Guide.
Click here for Clickbank's Everflow integration guide.
Step-By-Step Guide
Step #1 for ClickBank Integration
- Log into your ClickBank account and navigate to Vendor Settings > My Site and go to the Advanced Tools section.
Here you can find your Secret Key, which will need to be added in Everflow in order to configure the ClickBank Integration.
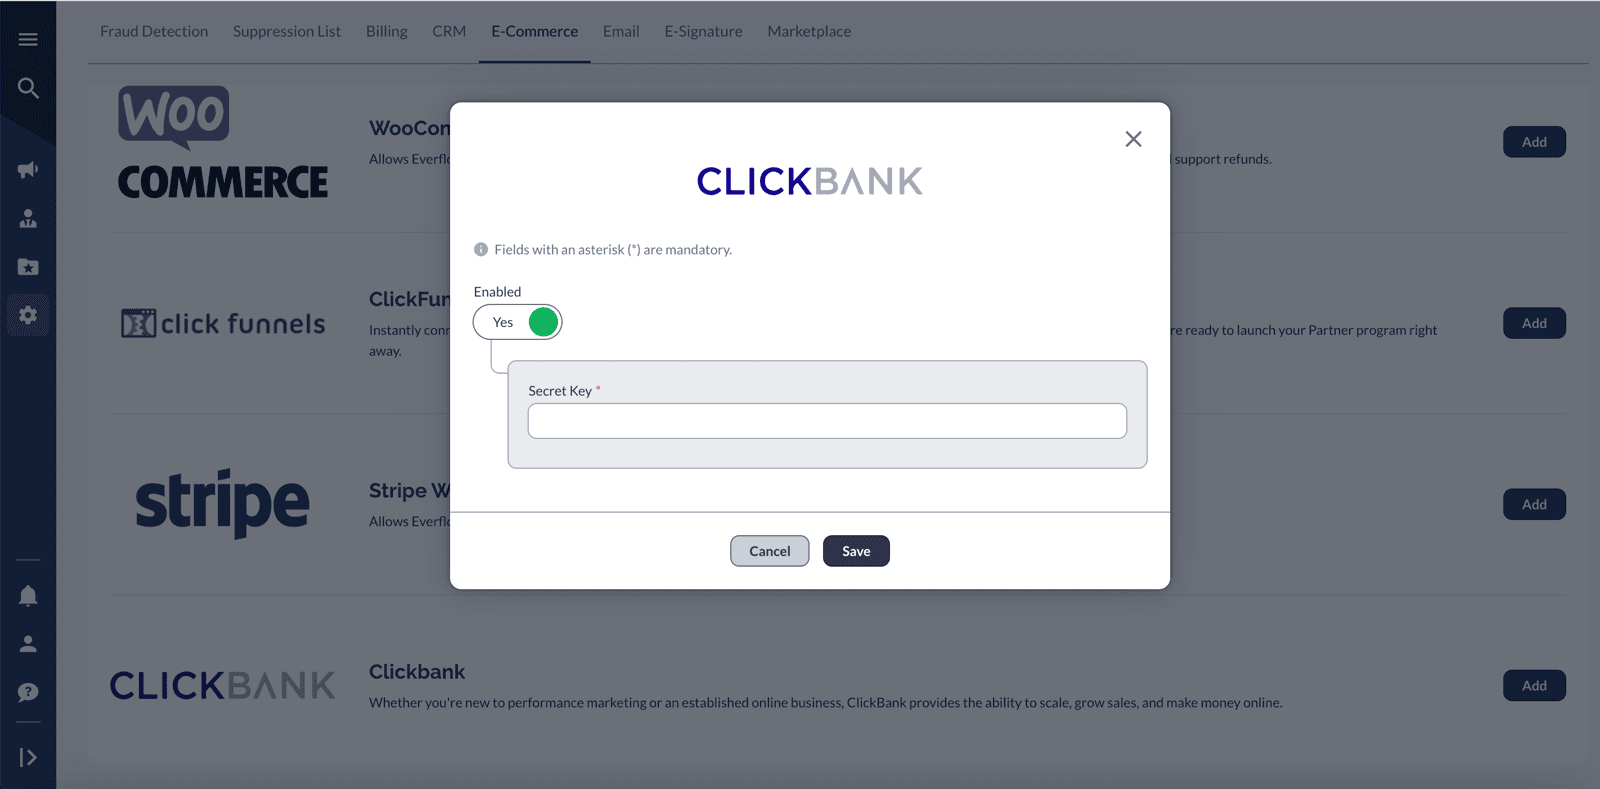
Step #2 for ClickBank Integration
- In Everflow, navigate to Integrations > E-Commerce and click Add next to ClickBank. In the window that pops up, toggle Enabled to the YES and enter the Secret Key.
Step #3 for ClickBank Integration
- Back in the Advanced Tools section in ClickBank, you will need to add the following Instant Notification URL:
https://api.eflow.team/v1/webhooks/integrations/clickbank/XXX
Step #4a for ClickBank Integration
For Vendors using Paylinks:
For Vendors using paylinks, The Everflow Transaction ID must be passed in the 'ef-transaction-id' parameter of your ClickBank Paylink. The Default Landing Page URL for your Offer in Everflow would look something like this:
https://ACCOUNT_NAME.pay.clickbank.net/?cbitems=1234&ef-transaction-id={transaction_id}
https://ACCOUNT_NAME.pay.clickbank.net/?cbitems=1234&ef-transaction-id={transaction_id}&vtid={transaction_id}
Step #4b for ClickBank Integration
For Affiliates using Hoplinks:
For Affiliates using Hoplinks, The Everflow Transaction ID must be passed in the 'tid' parameter of your ClickBank Hoplink. The Default Landing Page URL for your Offer in Everflow would look something like this:
https://hop.clickbank.net/?affiliate=AFFILIATE_NAME&vendor=VENDOR_NAME&tid={transaction_id}
Additional Details
Requesting Access to the Instant Notification URL
The Instant Notification URL field in ClickBank may require you to request API access before it can be used. To enable it:
- Log into your ClickBank account and navigate to Vendor Settings > My Site and click Edit.
- Locate the Advanced Tools section and click Edit.
- Click the Request Access link next to the Instant Notification URL field.
- Click the Save Changes & Request API Access button at the bottom of the form.
- Click the Save Changes button. This will generate your Secret Key, which can then be entered in Everflow under the ClickBank Integration.
Troubleshooting
When a Client Has Two ClickBank Accounts
If you are not seeing conversion tracking events from sales on ClickBank, work through the following checks. This is especially common when more than one ClickBank account is in use.
- Confirm that the Everflow integration setup was performed on the ClickBank Nickname account that will receive the Everflow {transaction_id}.
- Make sure the Everflow Transaction ID is being appended to the correct type of link for that account, as described below.
If the ClickBank Nickname account is a Vendor account:
The Everflow Transaction ID must be appended to the ClickBank Paylink using the ef-transaction-id parameter, like this:
https://SELLER.pay.clickbank.net/?cbitems=ITEM&ef-transaction-id=TRANSACTIONID
- SELLER = Your account nickname
- ITEM = The item number of your product
- TRANSACTIONID = The Everflow transaction tracking ID for this payment link. The Everflow macro is {transaction_id}.
If the ClickBank Nickname account is an Affiliate account:
The Everflow Transaction ID must be appended to the ClickBank Hoplink using the tid parameter, like this:
https://hop.clickbank.net/?affiliate=AFFILIATE&vendor=SELLER&tid=TRANSACTIONID
- SELLER = The seller, also known as the vendor nickname
- AFFILIATE = Your account nickname
- TRANSACTIONID = The Everflow transaction tracking ID for this campaign tracking link. The Everflow macro is {transaction_id}.


